PeasyBooking user manual
Everything you need to run your salon, spa, studio, or service business on PeasyBooking — written to be read straight through, once, by whoever sets things up. It’s one manual for all plans: every section is labelled with the plans it applies to, so you can see at a glance what’s included on your plan and what an upgrade would unlock.
How to read this manual
PeasyBooking has six plans, and each one includes everything in the plans below it. As you go up a tier you keep everything you already had and unlock more:
- Free — $0, free forever. 1 practitioner, owner-only login. Online booking, calendar, clients, services, your link-in-bio page, and 10 email reminders a month.
- Starter — $25/month. Up to 2 practitioners. Adds unlimited reminders and confirmations, staff logins, the Website Studio, secure messaging, and service notes.
- Team — $45/month. Up to 3 practitioners. Adds taking payments (deposits, pay-now, card on file, invoicing), classes and resource scheduling (rooms, chairs, equipment), the kiosk check-in tablet, and marketing campaigns (3 per month).
- Essential — $75/month. Up to 8 practitioners and 2 locations. Adds memberships, reviews, full reports, and a bigger campaign allowance (8 per month).
- Scale — $250/month. Up to 25 practitioners and 5 locations. Adds an included custom email domain and 15 campaigns per month.
- Custom — 26+ practitioners, unlimited locations, staff and campaigns. Everything, with negotiated terms — talk to us.
Prices are in Canadian dollars (US businesses are billed the same numbers in US dollars), and annual billing gives you 2 months free. There’s no per-booking commission and no per-practitioner fee — each plan is one flat price for the business.
Throughout the manual you’ll see a small badge under each heading. Here’s what they mean:
- All plans included on every plan, Free included
- Starter+ on Starter and every plan above it
- Team+ on Team and up
- Essential+ on Essential and up
- Scale on Scale (and Custom)
- Add-on a separately-priced extra you can add to any paid plan
A couple of capabilities — SMS reminders and a custom email domain — are add-ons: they’re billed on top of your plan and are noted with the Add-on badge where they come up.
A few features are switched on for your account separately from your plan — online card payments, SMS, and the booking-widget snippet. Their cards appear under Settings → Billing & add-ons once they’re available for your business; if you don’t see one, ask support.
1. Getting started
Available on: All plans
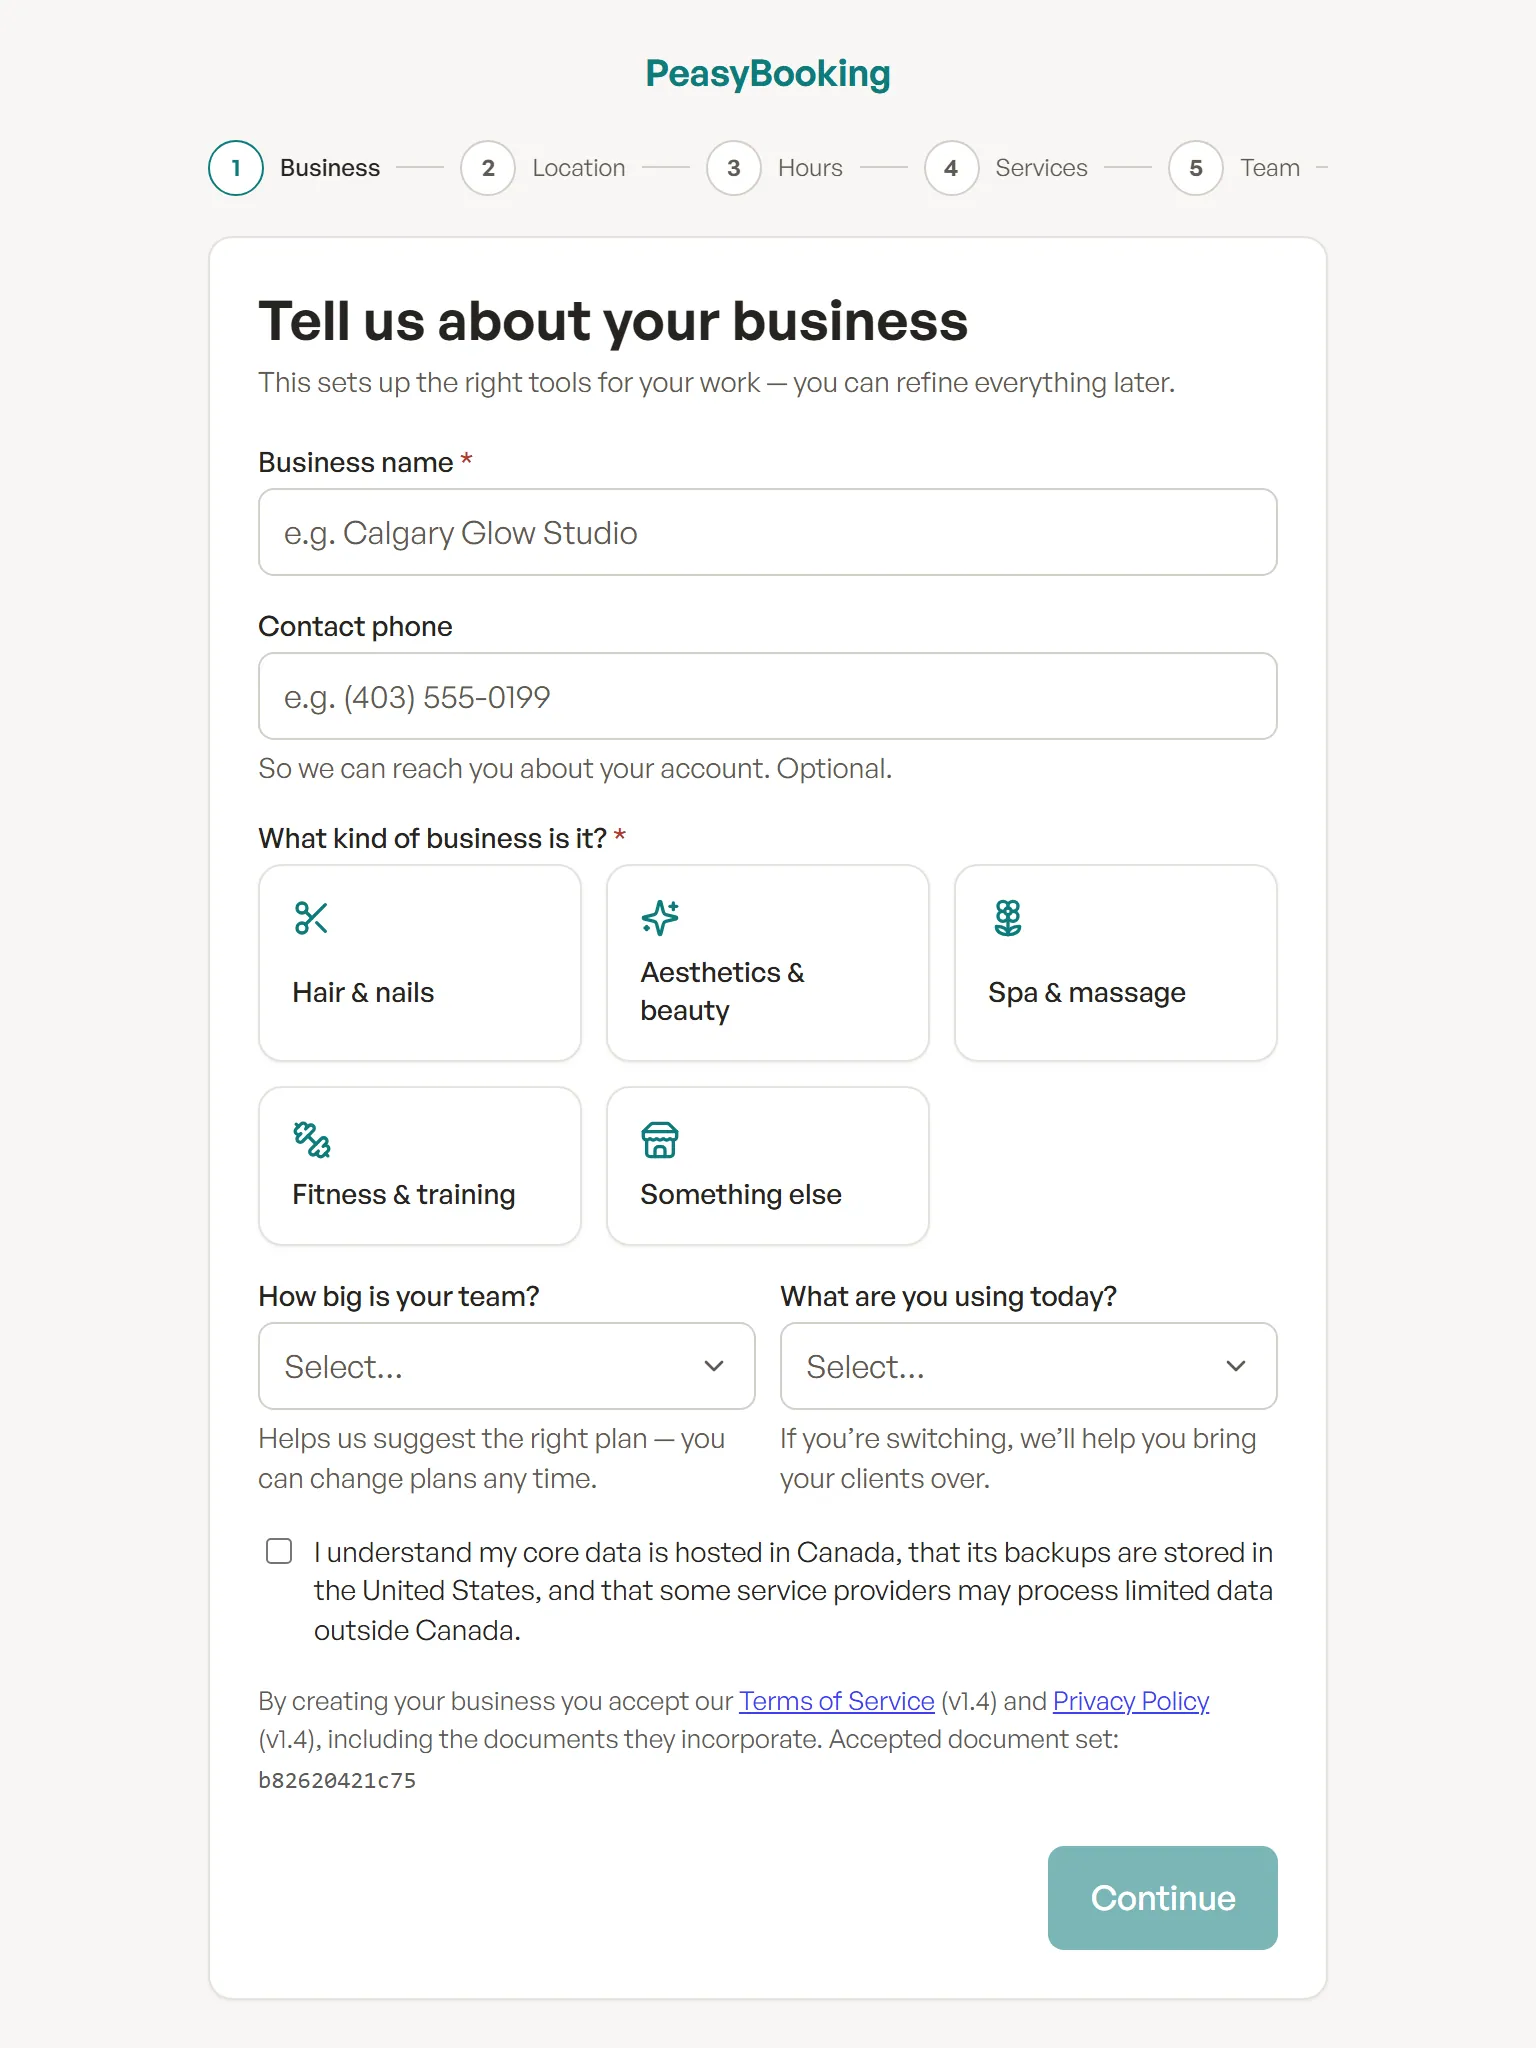
Guided setup — eight short steps from “Tell us about your business” to a live booking page.
Create your account at /signup with an email and a password — at least 8 characters with upper- and lower-case letters and a symbol, or any passphrase of 15 or more characters; a checklist under the field ticks each rule as you type. You start with a 14-day free trial of Starter — no card required — and can switch the trial to Team or Essential on the Plan step; the Free plan stays free forever. From there, a short guided setup walks you through eight steps. Every one of them can be revisited later in Settings, so don’t agonize:
- Business — your business name, your name as clients will see it (shown on your booking page next to the services you do; it starts with a guess from your email address, so check it), an optional contact phone, and your business type (Hair & nails, Aesthetics & beauty, Spa & massage, Fitness & training, or Something else — it tunes your starter services, modules, and vocabulary). Optionally pick your specialty — Barber, Nails, Lashes & brows, Tattoo, Pet grooming, or Massage — for starter services and dashboard words made for it (a pet groomer starts with baths and full grooms sized by dog, and sees “Pet parents” and “Groomers”). Tell us your team size (it helps suggest a plan) and, optionally, what you’re using today so we can help you switch. Then say who’s setting this up: the owner, or someone setting it up for the owner. Whoever creates the business becomes its owner, so ideally the owner does it; a helper should invite the owner to the team afterwards and hand the business over from Settings › Account.
Terms and Privacy acceptance — tick the box to accept the Terms of Service and Privacy Policy (it is never pre-ticked, and Continue stays off until you do). A helper ticks it on the owner’s behalf, confirming the owner authorized them. Your acceptance is recorded with the exact accepted document set, whose hash is shown under the box, and with whether you accepted as the owner or for them. The Privacy Policy includes where your data lives: core data is hosted in Canada, its backups are stored in the United States, and some service providers may process limited data outside Canada. - Location — name, street address, country, city, province, postal code, timezone, and phone for your first location — plus what clients see of your address: a shop or studio shows the full address on your booking page, while I work from home and I travel to clients show only your city (clients who book a home studio get the full address in their confirmation; travelling businesses tell them “We come to you”). If you travel to clients, the street and postal code are optional — city and province or state are still needed. More branches can be added later under Settings → Locations: Free, Starter, and Team include one location, Essential two, Scale five, and Custom as many as you need. Your first (main) location always comes first — in the locations list, in your dashboard’s defaults, and on your booking page.
- Hours — per-day open and close times (Monday–Friday defaults on, weekends closed). Breaks, holidays, and per-staff schedules live in Settings.
- Services — starter services for your field are pre-seeded, all editable and removable; add your own, or press Skip for now — skipping removes the sample services you haven’t changed, and keeps anything you edited or added. If you told us you’re moving from another booking tool, you can also Start with an empty menu and import your own at the end of setup.
- Team — add teammates now or skip; working solo is perfectly fine. A practitioner you add here starts with the same working hours as the schedule already running at that location, so they’re bookable straight away.
- Workspace — a preview of which navigation modules will show for your field (hidden ones can be enabled any time in Settings), your dashboard vocabulary, and optional starter intake and consent form templates (they do nothing until you require one).
- Plan — pick a plan in-flow, monthly or annual; each plan card lists exactly what it includes (practitioners, locations, and features). Starter, Team, and Essential come with a 14-day no-card trial that’s already running; subscribing bills you that day. Scale is billed today — no trial. Or choose “I’ll decide later” and keep exploring: your trial keeps running, and when it ends you land on Free unless you’ve subscribed — nothing is ever charged.
- Launch — your booking page goes live at
app.peasybooking.com/p/your-business. Copy the link, print the QR code for your front desk, preview the page, and copy a ready-made line for your Instagram bio. This screen also offers the CSV import (you see a preview and a report of any rows that need attention before anything is saved) and the best three minutes you’ll spend today: a short test-booking checklist — open your booking page and book a service as if you were a client, watch it appear on your calendar and check the confirmation email, then cancel it from the calendar to free the slot.
After setup you land on Home — your business at a glance (see the next section).
Finding your way around
The left menu (the “sidebar”) groups everything by how you work: Daily work (Home, Front desk, My day, Calendar — plus Kiosk and Classes when those modules are on), Care (Clients, Chat, Forms), Business (Services, Payments, Memberships), Growth (Marketing, Reviews, Link-in-bio), and Management (Reports, Settings). The notification bell sits at the top of the sidebar, next to the PeasyBooking name, and your business name sits just below it — if you belong to more than one business, it’s a switcher. The sidebar’s footer holds the link to this manual, your setup progress, and your account menu (your email and role, New business, and Sign out). Modules you’ve hidden (or that start hidden for your field, like Kiosk or Classes for a beauty business) appear in the menu as soon as you enable them under Settings → Workspace. PeasyBooking works on any device — on phones the sidebar becomes a bottom bar with four tabs and a More sheet for everything else, and the bell moves to the top-right corner, so you can run the day from behind the desk or on the go.
Put PeasyBooking on your home screen
PeasyBooking runs in your web browser, and you can also add it to a phone’s or tablet’s home screen so it opens like an app, straight onto Home. On an iPhone or iPad, open PeasyBooking in Safari, tap Share, then Add to Home Screen. On Android, open it in Chrome and choose Add to Home screen (or Install app) from the browser menu. On a computer, Chrome and Edge offer the same install option in the address bar. Installing changes only how PeasyBooking opens — booking alerts still reach you by email and on the notification bell.
2. Home — your day at a glance
Available on: All plans
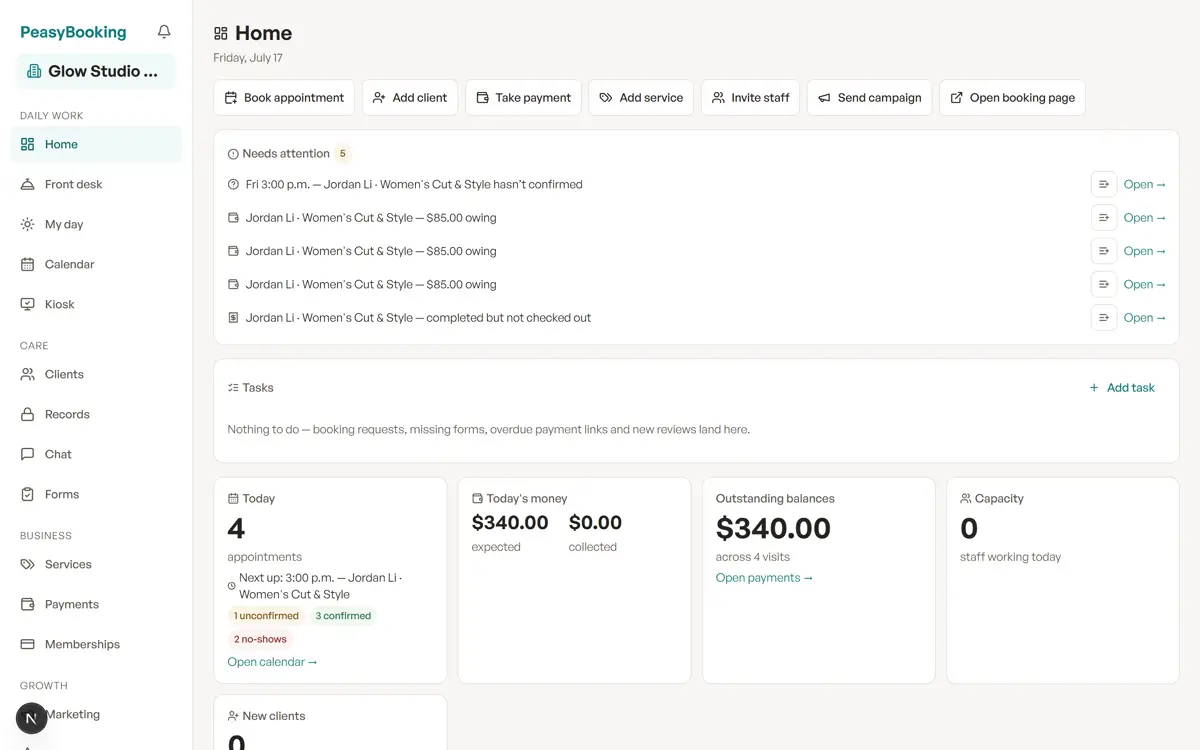
Home — your business at a glance the moment you sign in.
Home is the first page you see when you sign in. It answers “how is today going?” without opening anything else, and every number on it links to the page where you act on it.
- Quick actions — one-tap buttons for the things you do all day: Book appointment, Add client, Take payment, Add service, Invite staff, Send campaign, and Open booking page.
- Tasks — your to-do inbox. Booking requests, missing intake forms, overdue payment links, and new reviews land here as tasks, and you can add your own with Add task. See Tasks & the notification bell.
- Needs attention — what needs a person: booking requests to accept or decline, unconfirmed visits, balances owing, missing intake forms, cancellations that freed a slot, and visits waiting on checkout. Each row can become a task in one tap.
- Approvals needed — for whoever can approve them, money requests from teammates who went over their limit (see Money permissions).
- Today — how many appointments you have, how many are confirmed vs unconfirmed, and who’s up next.
- Today’s money — what you expect to take in today and what’s been collected so far, plus Outstanding balances across visits that still owe you money (owners and managers only).
- Capacity — how many staff are working today and what share of the day is booked.
- New clients — people who joined in the last 7 days.
While you’re setting up, Home also carries a Finish setting up checklist (working hours, services, team) with a progress meter, and while you’re on a trial, a card shows the trial’s end date with a Choose a plan button. If clients would still see you by your email handle, a one-time Set your display name card asks for the name you’d like on your booking page.
3. Your account, team & roles
Available on: All plans· staff logins require Starter and up
PeasyBooking uses role-based access so each person sees only what they need. There are three everyday roles:
- Owner — full access, including billing, payments, and account settings. Whoever creates the business is its owner; you don’t invite someone as an owner — you transfer ownership to them instead. Online booking, cancellation and reschedule emails go to every owner of the business.
- Receptionist — front desk: calendar, clients, bookings, services, and imports across the whole business, but not billing or account settings. Receptionists sign in straight onto the Front desk page — today’s operational queue.
- Staff (practitioner) — they sign in straight onto My day: their own schedule and their own clients.
Seats & who counts
Available on: All plans
Each plan includes a number of billable practitioner seats — Free 1, Starter 2, Team 3, Essential 8, Scale 25, Custom unlimited. Receptionists don’t count against that limit (paid plans include unlimited receptionists; Free is owner-only). Settings → Team shows how many seats you’ve used. When you try to add a practitioner beyond your plan’s limit, a Room for your whole team prompt names the plan that fits. During your free trial you can Continue my free trial on that plan at no charge (the trial keeps its end date, and no card is needed) and then add your teammate; otherwise Choose the plan to subscribe. The seat isn’t added until the plan has room.
Adding & removing teammates
Available on: Starter+· owner or receptionist manages the team
On Free only the owner has a login. From Starter up, manage your team under Settings → Team:
- Enter their name and email, choose a role — Receptionist or Staff — and click Add teammate. A new Staff member starts with the working hours already running at their location (yours there, or the fullest teammate’s), so they’re bookable straight away; adjust them under Settings → Schedules. A practitioner with no hours shows a No hours yet — set hours badge, and isn’t offered on your booking page until they have some.
- Use Invite to sign in to send them a login link; their status shows Active once they’ve signed in.
- To remove someone, click Remove on their row and confirm. They lose access, their login is revoked, and their seat is freed — so if a practitioner leaves you can reclaim the seat without upgrading. You can always add them again later.
Handing the business to its owner
Available on: Starter+· the current owner starts it
If someone else set PeasyBooking up — a receptionist or a manager — they can hand the business to its real owner without starting over:
- Add the new owner under Settings → Team (as a Receptionist or Staff) and send them an invite. They need to have signed in at least once, and they can’t be an Accountant. A teammate who is already a co-owner can be chosen too.
- Go to Settings → Account → Transfer ownership, choose them as New owner, and pick Your role afterwards (Receptionist, or Staff if you take appointments). If nobody qualifies yet, the card says why for each teammate.
- They see a prompt the next time they open PeasyBooking (and get an email). To accept, they tick the box accepting the Terms of Service and Privacy Policy on behalf of the business and click Accept ownership; they become the owner and you switch to the role you picked. Until then you can cancel; an unanswered request expires after 7 days.
For your security, starting and accepting a transfer may ask you to sign in again. Each person keeps their own login — a transfer doesn’t change the email anyone signs in with. On a paid plan, PeasyBooking invoices go to the new owner’s email once they accept.
4. Plans & billing
Available on: All plans· managed by the owner
Settings → Billing & add-ons — switch plans, choose monthly or annual, and manage your card, all through Stripe.
Every new account starts on a 14-day free trial of Starter (or of the plan you picked on the pricing page) — no card required, and it’s already running the moment you sign up. On the setup Plan step you can switch the trial to Team or Essential; the end date stays the same. Subscribe to Starter, Team, or Essential any time (you’re billed that day), or let the trial run out and land on the Free plan with all your data intact. Scale has no trial — it’s billed the day you subscribe.
Manage everything under Settings → Billing & add-ons:
- Choose Monthly or Annual — 2 months free with the billing-period toggle.
- Pick a plan to start a secure Stripe checkout (we never see your card number). Subscribing bills you that day.
- Use Manage billing & payment method to update your card, view invoice history, or change plans.
The same tab holds the two add-ons — SMS reminders ($15/month, see Reminders) and a custom email domain ($25/month, included on Scale — see Custom email domain) — plus online payments, the booking-widget snippet, and search visibility for your public pages.
Marketplace, honestly. We’re building an optional discovery marketplace — listings so nearby clients can find you, for a flat monthly fee, with no commission on your bookings, ever. It isn’t purchasable yet: you may see the card in Settings, but checkout isn’t enabled. When it launches, joining will be entirely optional and your direct bookings stay yours either way.
Currency & tax. Your plan is billed in your local currency — Canadian dollars in Canada, US dollars in the United States — and any applicable sales tax is calculated and shown at checkout. For businesses outside Canada, Stripe processes the subscription as the merchant of record and handles sales tax on our behalf; the price you see is the same either way. (This is about your PeasyBooking subscription and add-ons — it’s separate from how you take payments from your own clients, covered under Payments & checkout.)
Downgrades take effect at the end of the current billing period, and your data is never deleted on a downgrade — features that aren’t in your new plan simply become read-only or hidden until you upgrade again.
5. Calendar & scheduling
Available on: All plans
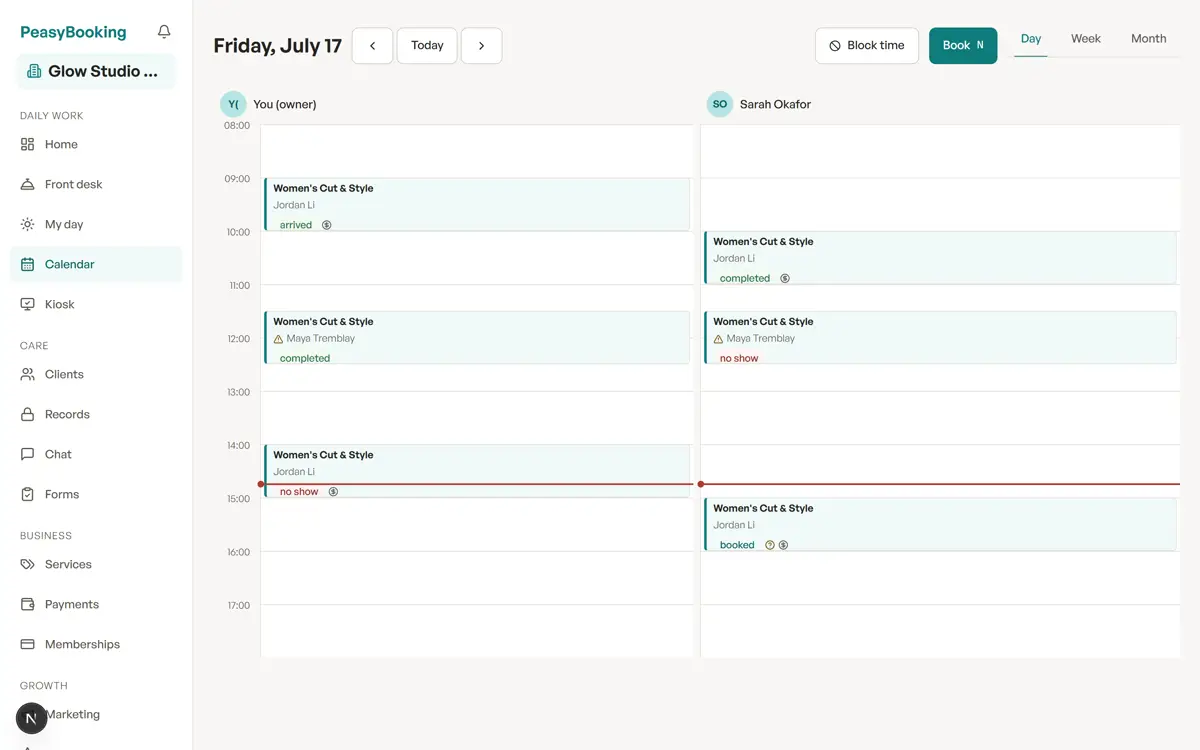
Week view — the time grid with every visit in place. Click any open time to book it.
The Calendar is your daily hub, with Day, Week, and Month views. PeasyBooking prevents double-booking automatically — a staff member or resource can never be booked into an overlapping slot.
- Day shows one column per team member working that day, with hours outside their working time shaded (a day off reads Not working).
- Week shows seven day columns, with overlapping visits side by side. When you have more than one practitioner, Show staff narrows it to one person. Click a day’s heading to open that day.
- Month is a month grid: each day lists up to three visits (time and client) and a + more link when there are others. Click a date to open that day.
Day and Week always show the time grid — even on an empty day — so you can book straight from it.
Booking and managing an appointment
- Click any open time on the grid, or press Book (or the N key). Clicking the grid opens the booking window on that day with that practitioner chosen; once you pick a service, that exact time is selected if it’s open. Pick or create a client (+ Add new client), choose the service, and pick from the conflict-free times offered, then Confirm booking.
- For a standing appointment, set Repeat to Weekly for N weeks (2 to 12 weeks) after picking a time. Each week books the same day and time; a week that’s already taken is skipped and named in the confirmation, so you can place it by hand.
- Click any appointment to open its detail drawer, where you can Accept request, Confirm, mark Arrived, Start the service, Finish it (service done, awaiting checkout), Complete the visit, Cancel visit, or flag a No-show. The drawer also shows the visit’s readiness: how it was booked, whether the client confirmed, reminders already sent, the client’s previous visit, and any active memberships or package credits. Once a visit has a payment, its Receipts section lets you email or print a receipt (see Receipts).
- Drag an appointment to reschedule (it snaps to 15 minutes), or use 15 min earlier / 15 min later in the drawer. Cancelling frees the slot and is undoable (Reopen visit) — there’s no scary confirmation to fight through. Owners, managers and receptionists can also fix a mis-clicked outcome under Correct status (for example, a no-show back to arrived); every correction is logged.
On the calendar itself, small markers show each visit’s readiness at a glance: a ? when the client hasn’t confirmed and a $ when a balance is owing. Clients can confirm from their manage link (the one in every confirmation and reminder) or by replying 1 to an SMS reminder, and your Home page lists anything that still needs a human — unconfirmed visits, balances, freshly freed slots, and visits waiting on checkout.
The calendar is the whole business’s view. Two companion pages show the same day from a particular chair: Front desk for the reception team and My day for each practitioner.
Working hours, time off & block time
Each staff member has working hours that define when they’re bookable. To take time out of the schedule, use Block time on the calendar (choose who — one person or Everyone (whole location) — the date, a from/until time, and a note) for breaks, admin time, or a closed afternoon. The note shows on the calendar, and blocked time is removed from online booking automatically. Add longer time off for vacations the same way. Services can also include setup/cleanup buffers and, for salons, a processing-gap during which the room stays held but the stylist is free.
6. Front desk — the reception view
Available on: All plans
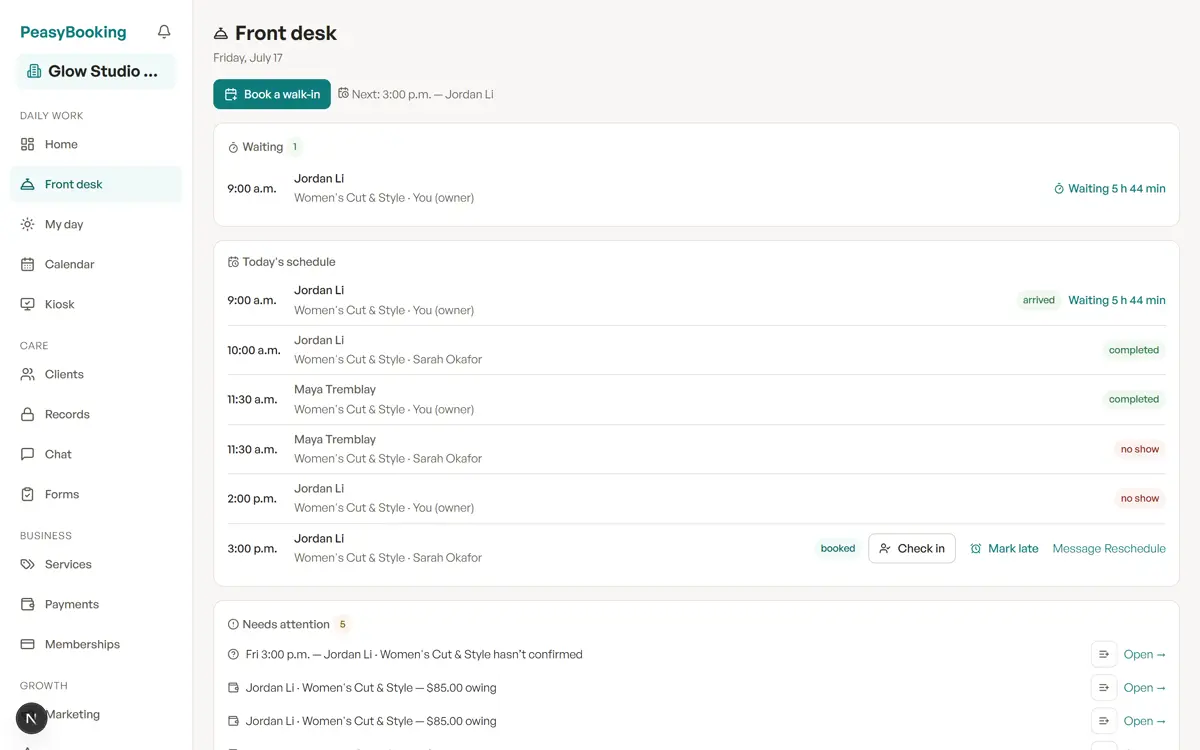
Front desk — today from the reception team's chair: arrivals, walk-ins, tasks, and the waitlist.
Front desk (under Daily work in the sidebar) is the reception team’s home: everything about today, with no financial analytics. Receptionists land here when they sign in; owners and managers reach it from the sidebar. Use it to greet arrivals, book walk-ins, and keep the day moving.
The page shows:
- Today’s schedule — every appointment, who’s arriving next, and who’s currently Waiting (and for how long). Each row has one-tap buttons: Check in (the very same check-in the kiosk performs — the practitioner gets a quiet heads-up on the notification bell), Mark late (and Clear late), Message, Reschedule (jumps to the calendar), and Checkout when a finished visit needs paying.
- Book a walk-in — a walk-in is someone who shows up without an appointment. This button opens the same booking window as the calendar, right from the page.
- Tasks and Needs attention — the same lists as Home, so reception sees booking requests, missing forms, and overdue payment links without switching pages, plus a link to any unread client messages.
- Due to rebook — clients who visited recently but have nothing booked next. Press Book to offer their next visit while the last one is still fresh.
Waitlist — cancellations refill themselves
The waitlist is a list of guests who wanted a time you didn’t have. When your day is full, guests join it right from your booking page (“Can’t find a time that works? Join the waitlist”) — they pick the service, a date window, and how to reach them. The moment a matching appointment is cancelled, the freed slot is offered automatically: the guest gets an email (and a text, with SMS consent) with a link that holds the time for 10 minutes — one tap books it, no sign-in. If they don’t take it, the slot moves on.
Two offer policies, set per location under Settings → Schedules → Booking rules: Strict queue — one offer at a time (the default) offers one person at a time, oldest first; First to confirm wins notifies everyone who matches and the quickest reply gets it — everyone else quietly stays on the list.
The Front desk page shows the live queue. For each waiting guest you can:
- Press Offer next opening to send them the soonest time inside their window — the row flips to Offer out and they have 10 minutes to grab it.
- Press Skip to pass an unanswered offer to the next person (the skipped guest keeps their place for future openings).
- Press Remove to take them off the list.
Reception can also add a client to the waitlist from the checkout rebooking prompt.
7. My day — the practitioner view
Available on: All plans
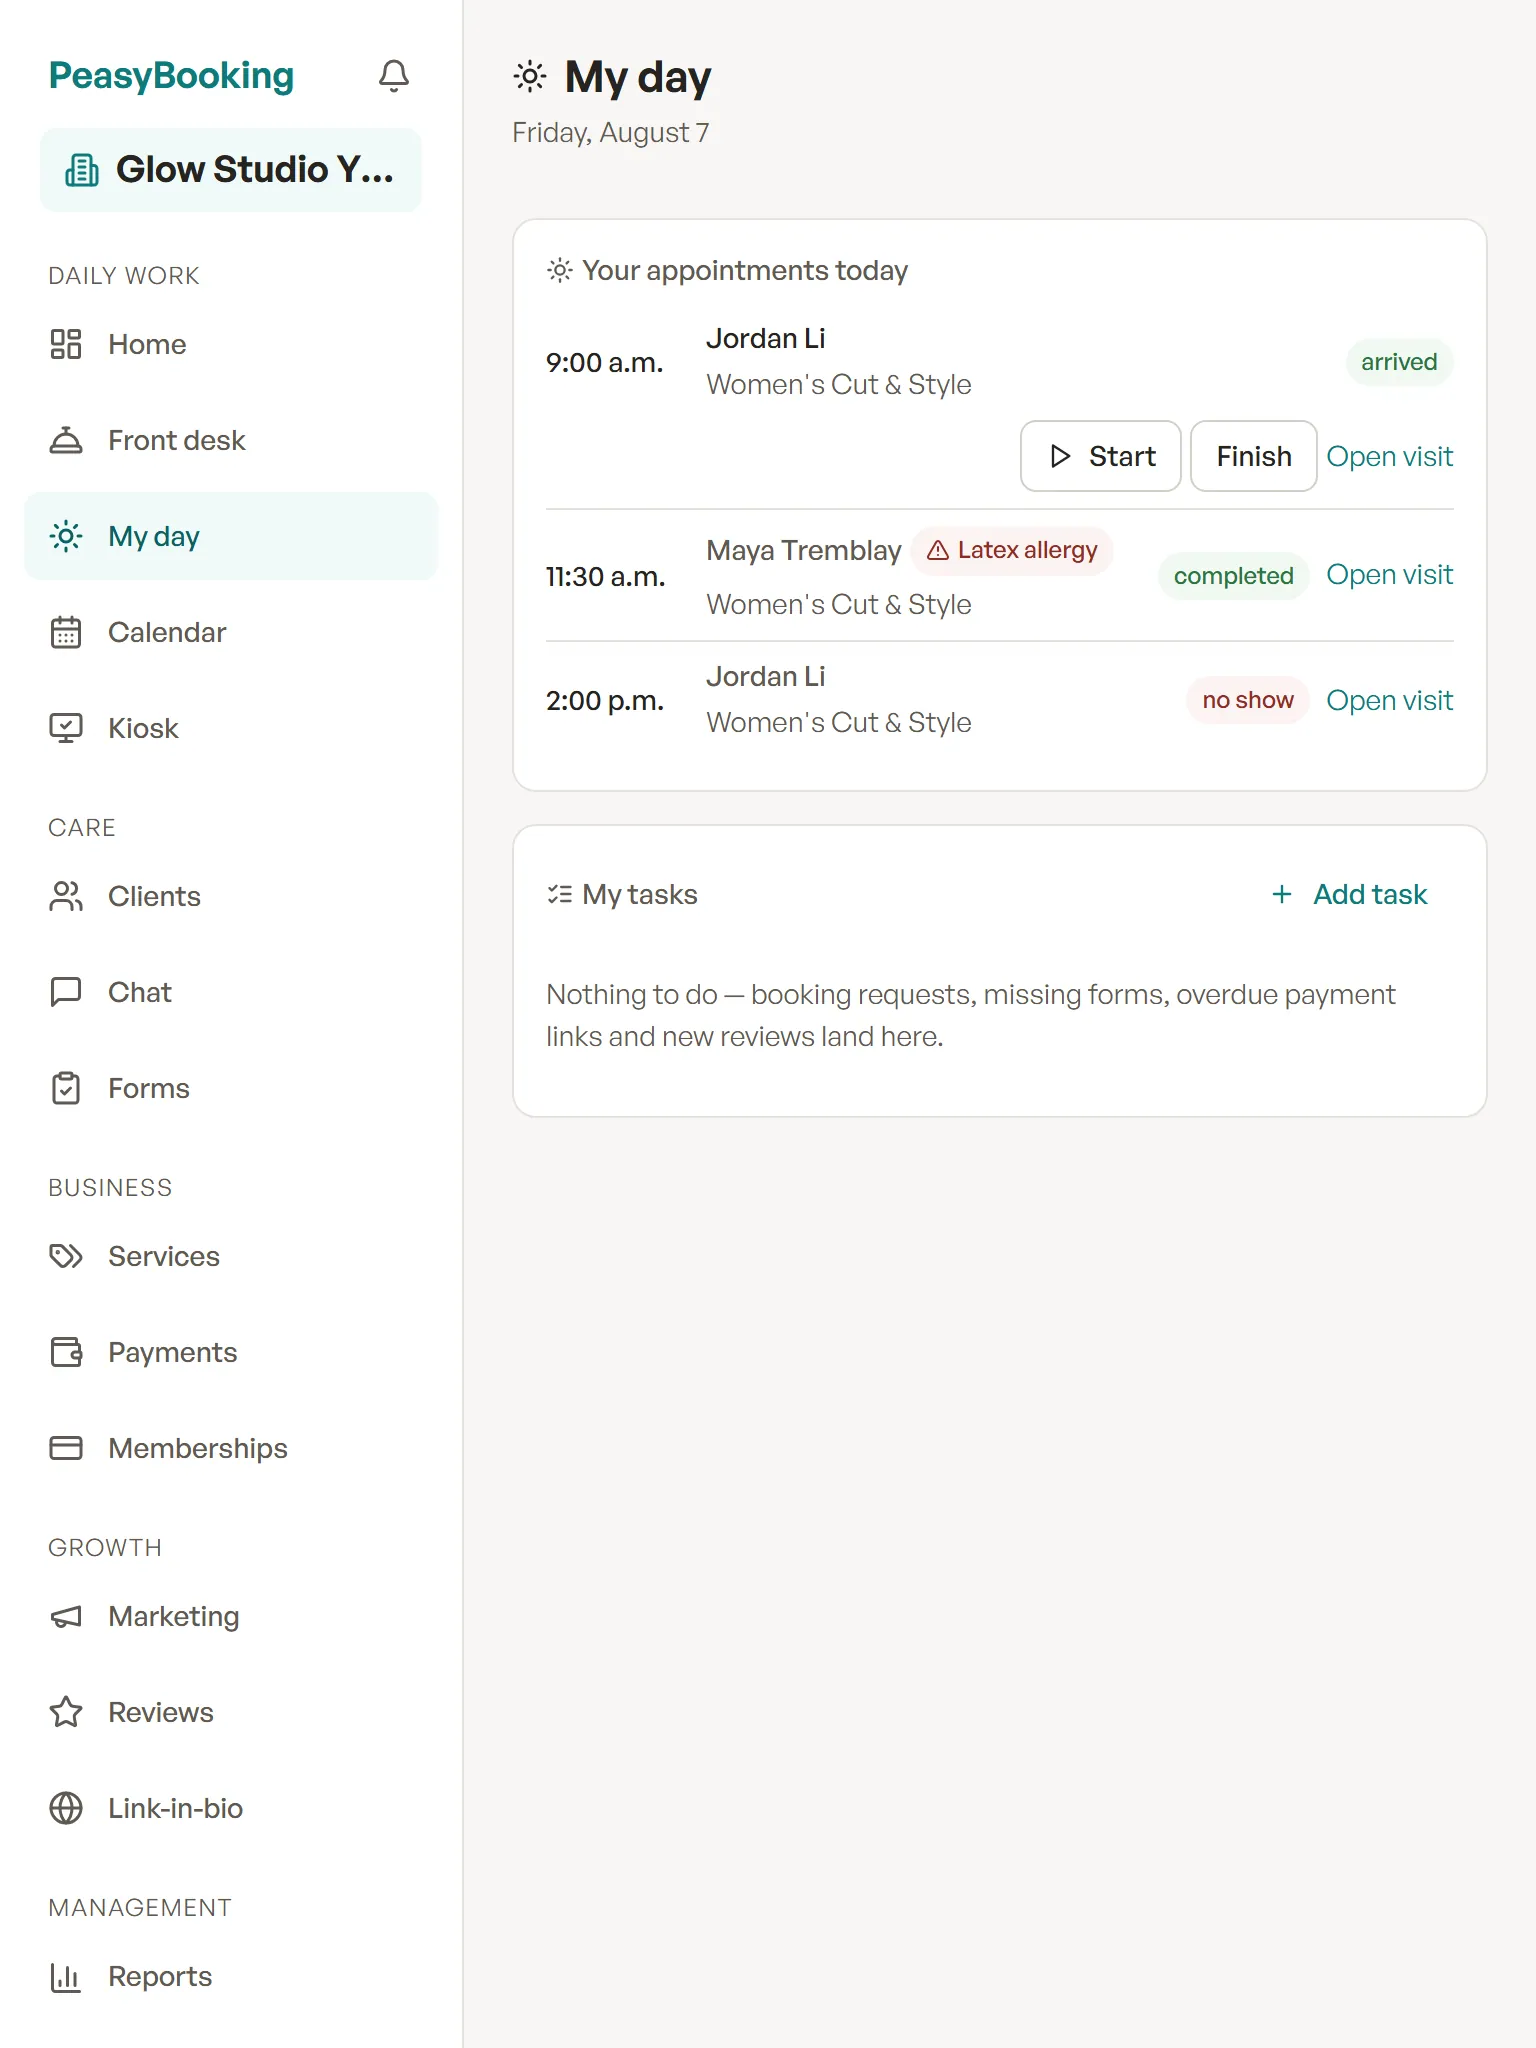
My day — your own schedule for today: each visit moves from arrived to started to finished, and your tasks sit underneath.
My day (under Daily work in the sidebar) shows a practitioner only their own appointments for today — never anyone else’s schedule. Practitioners land here when they sign in. Each appointment card shows the client (with their allergy flag if one is on file), the arrival state, and one-tap actions as the visit moves along:
- Arrived — the client is here.
- Start — the service has begun.
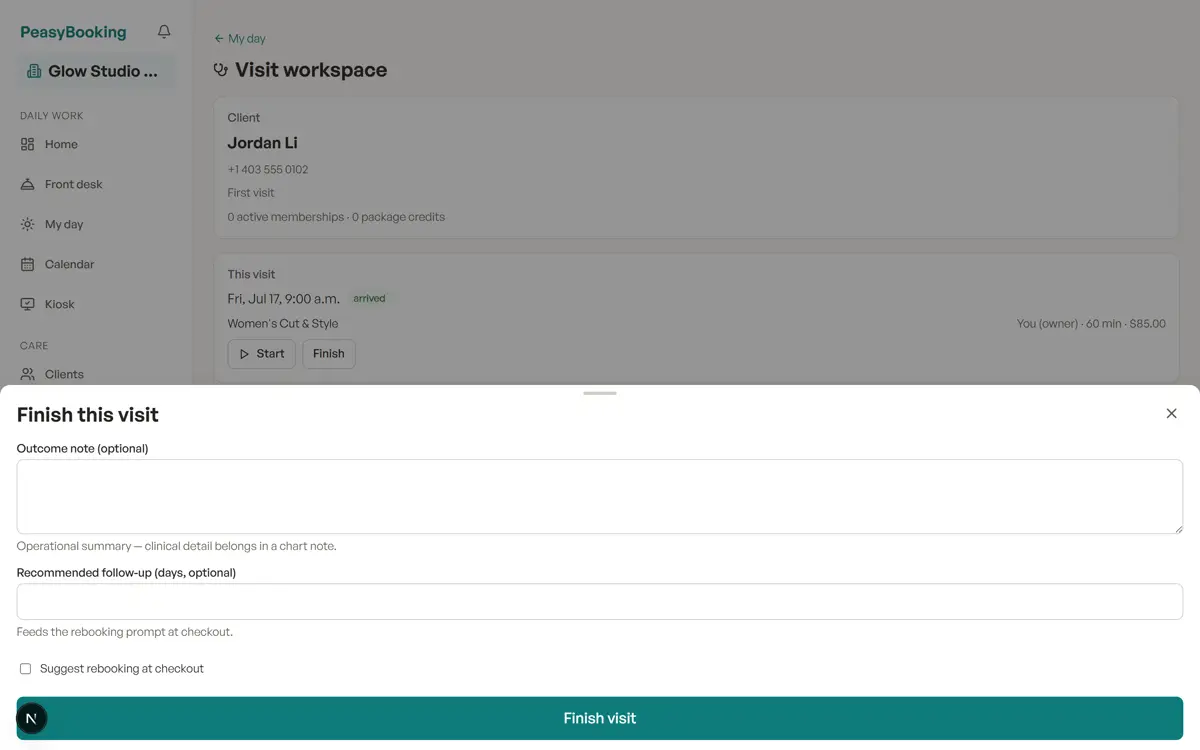
- Finish — the service is done. This opens the small “Finish this visit” form — every field optional: an Outcome note (a short, non-sensitive operational summary), a Recommended follow-up in days (it feeds the rebooking prompt at checkout), and a Suggest rebooking at checkout tick-box. Press Finish visit and the visit lands in the checkout queue.
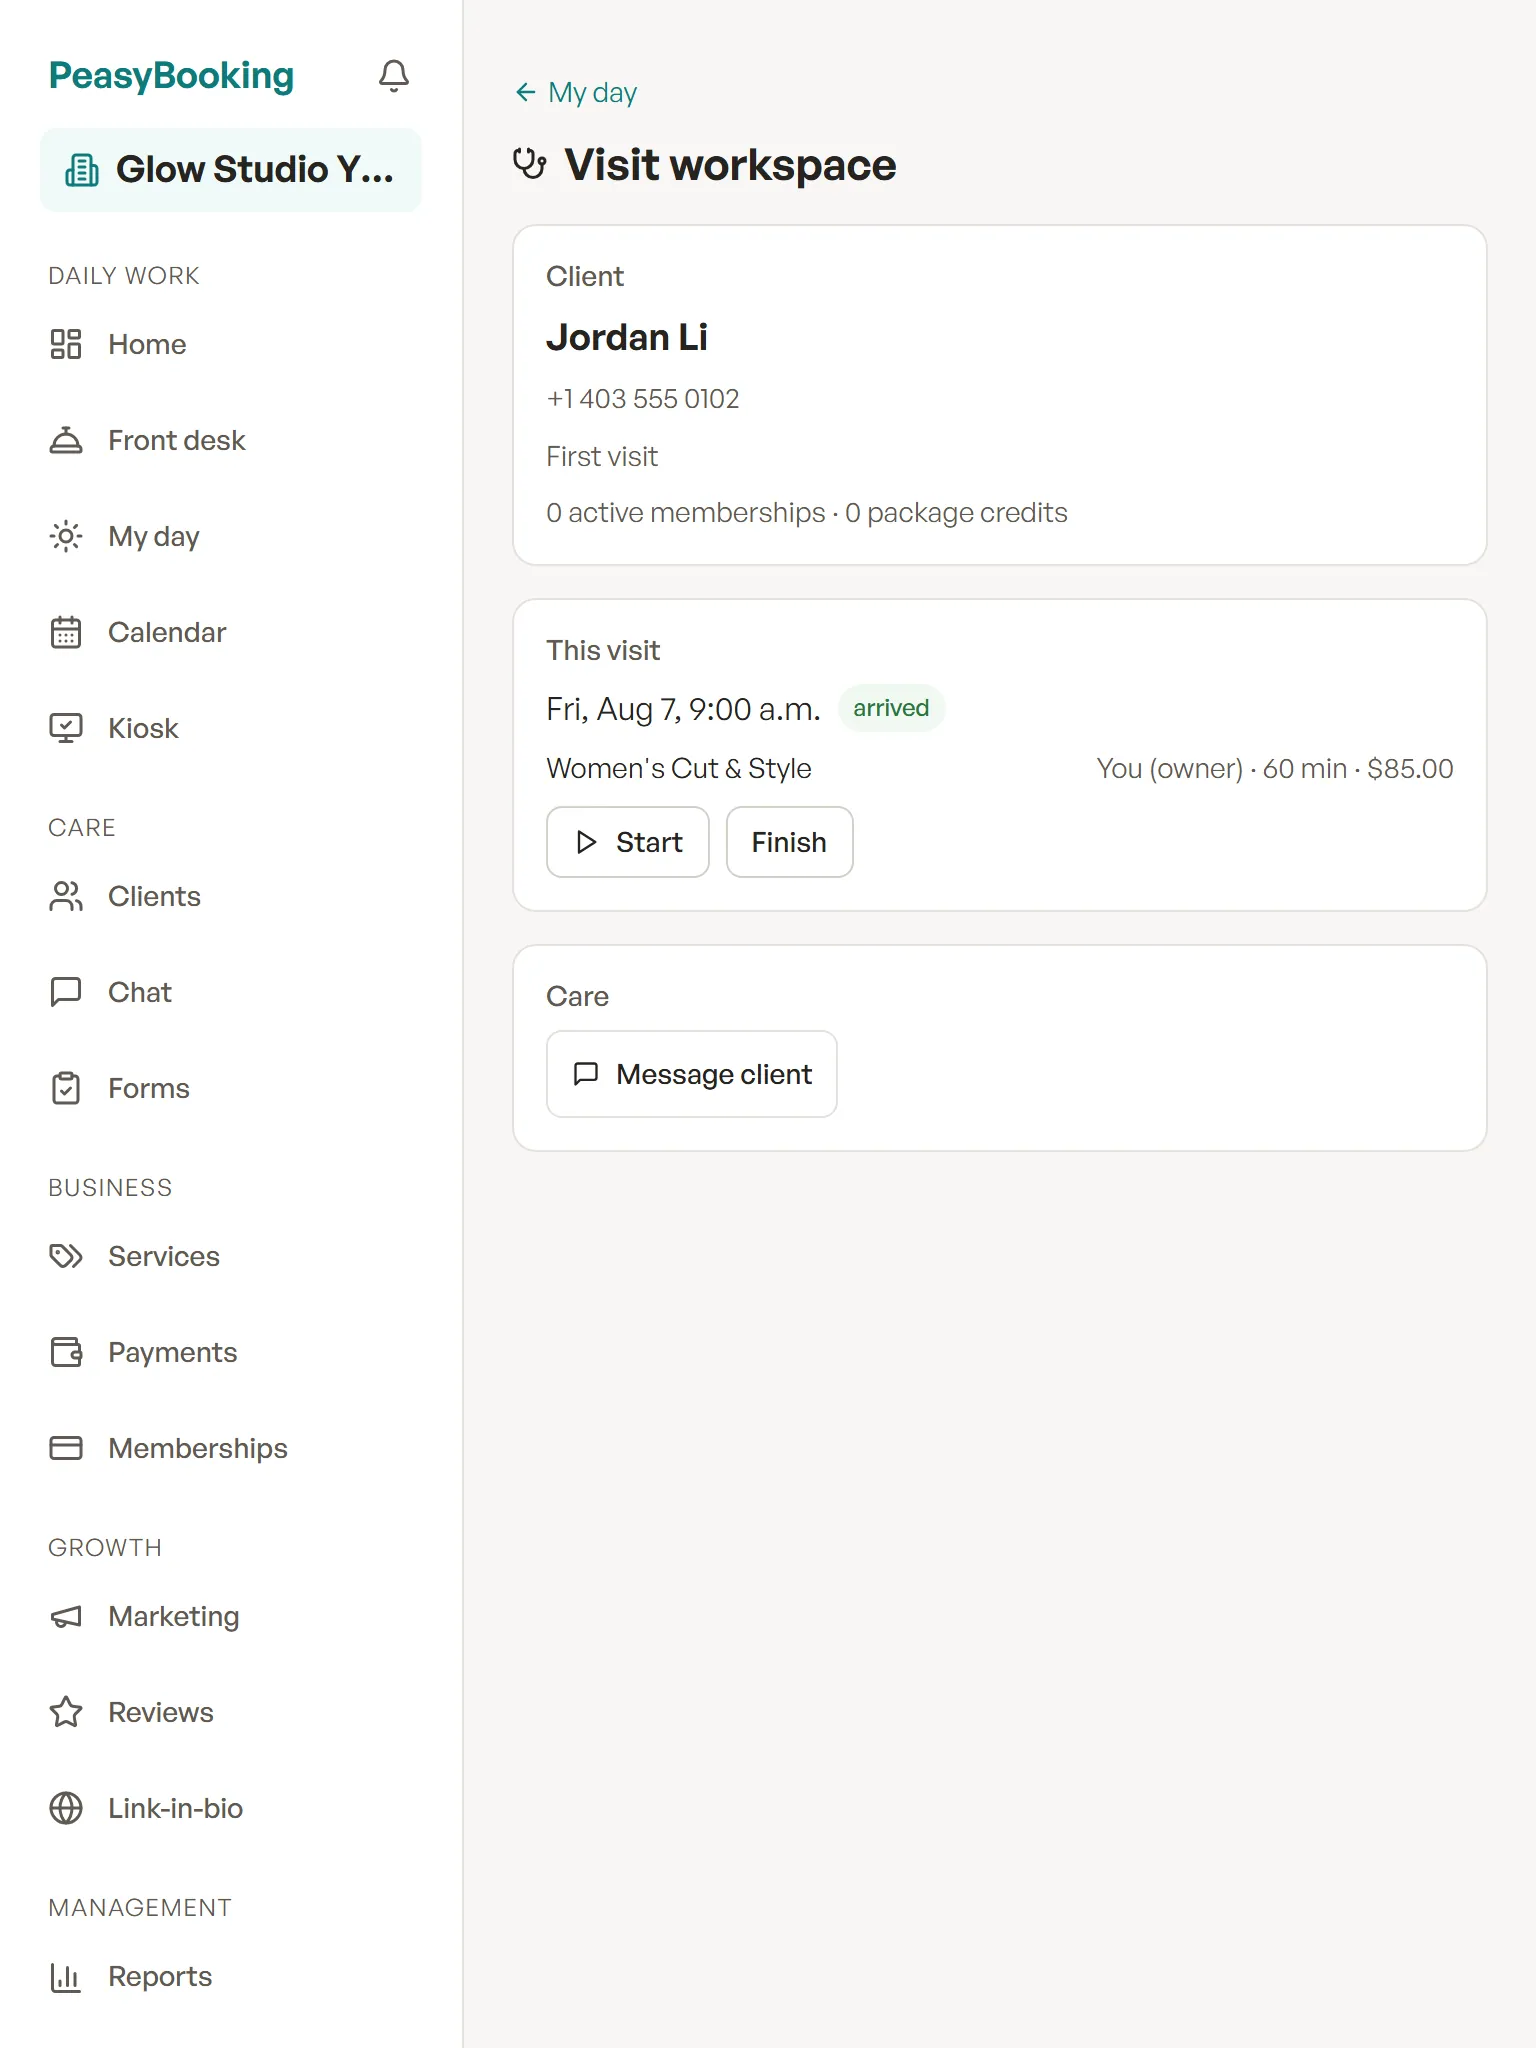
Open visit — the visit workspace puts the client, the services, and checkout one tap away.
Open visit (on the card, or “Open visit workspace” in the calendar drawer) opens the visit workspace: the client’s details and alerts, their previous visit (or “First visit”), active memberships and package credits, the services being delivered, the same Arrived / Start / Finish / Complete buttons, the visit’s service notes (when that module is on), and one-tap Message client and Open checkout buttons. My day also shows a count of unread client messages, and each staff member sees the tasks aimed at them here under My tasks.
For aesthetics businesses, the Finish form also captures product, lot number and service area — operational traceability that then shows on the visit workspace.
8. Clients
Available on: All plans
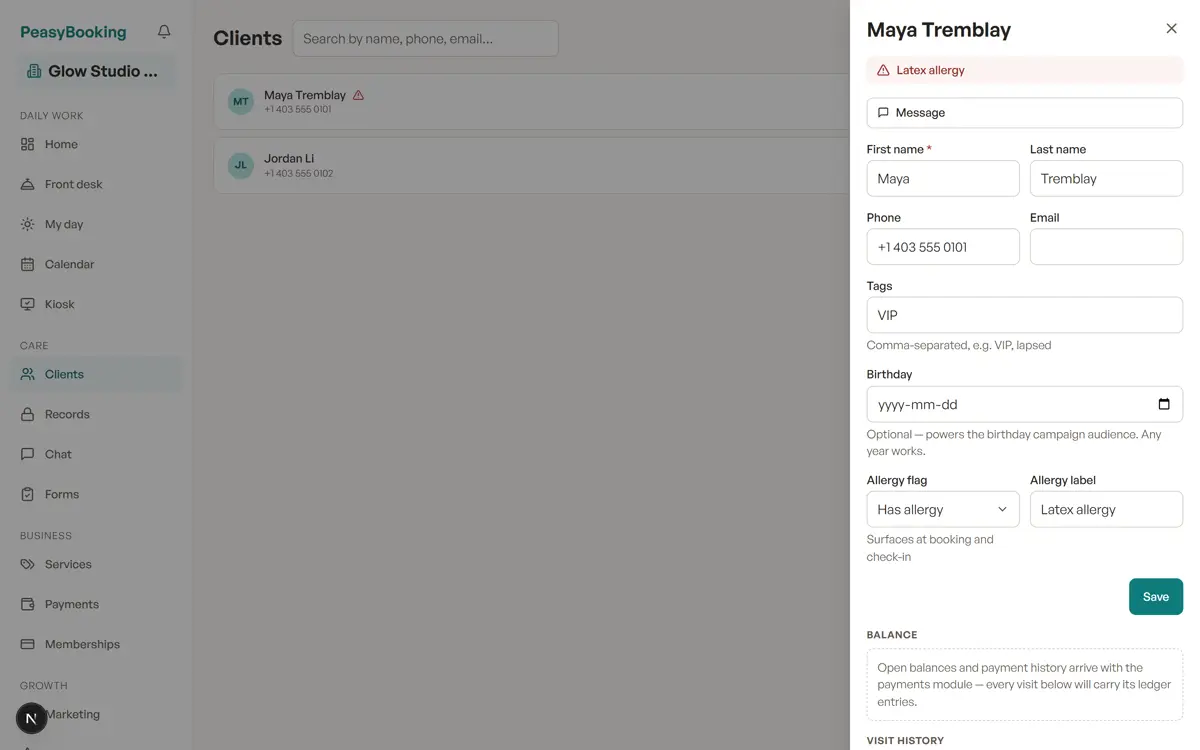
The client profile — a full page with the client list beside it, totals at a glance, and tabs for everything about the client.
The Clients area is your address book and visit history. Most clients are created automatically the first time they book online — you only add someone by hand when they call or walk in. Click a client to open their profile as a full page. On a wide screen your client list (with search) stays on the left, so the next client is one click away; on a phone, All clients takes you back to the list.
- The header — name, tags, any allergy alert, phone, email, Last visit and Next visit, and a Message button. Below it, four totals over the client’s whole history: Total bookings, Upcoming, No-shows and Cancellations.
- Overview — the Details form (name, phone, email, tags, birthday, allergy flag), the Balance card, and Merge duplicate. The Balance card (Team plan and up; owners, managers, receptionists and accountants) shows what the client owes right now — “Owes $…”, or “Nothing owed — every visit is paid.” — with each unpaid visit listed with a Take payment link, and their recent payments and refunds.
- Visits — their visit history, newest first (the 50 most recent); each visit opens its visit page.
- Service notes — when the module is on (see Service notes).
- Forms & consents — every form the client has signed, with how it was signed, a View and a PDF button, and Fill on this device to have them fill one in right now (see Forms & consents).
- Messages — the communications timeline (below).
The tab you’re on is part of the page address, so a bookmark or a reload lands on the same tab.
To add a client yourself:
- Click Clients in the left menu.
- Click Add client.
- Enter their first and last name, phone, and email — plus an optional birthday (it powers the birthday campaign audience and nothing else; any year works). Save, and they’re ready to book.
On each profile you can also:
- Tags (e.g. “VIP”) help you segment clients; the allergy flag surfaces a prominent warning on the profile for anyone who needs to see it.
- Found a duplicate? On the client you’re keeping, use Merge duplicate: pick the duplicate, press Merge…, and confirm with Merge clients — the duplicate’s visits move over, its details fill any gaps, and the duplicate is removed. This can’t be undone. (There’s no “delete client”: merging preserves history, which matters for retention and reporting.)
- The Messages tab (Communications) shows one timeline of everything the client has been sent or has sent you — reminders and confirmations, marketing campaigns, and secure messages (when a message was exchanged, never its content). It’s a read-only view: nothing sends from here.
To bring an existing client list over from another tool, see Importing your data.
9. Service notes
Available on: Starter+· existing notes stay readable on Free
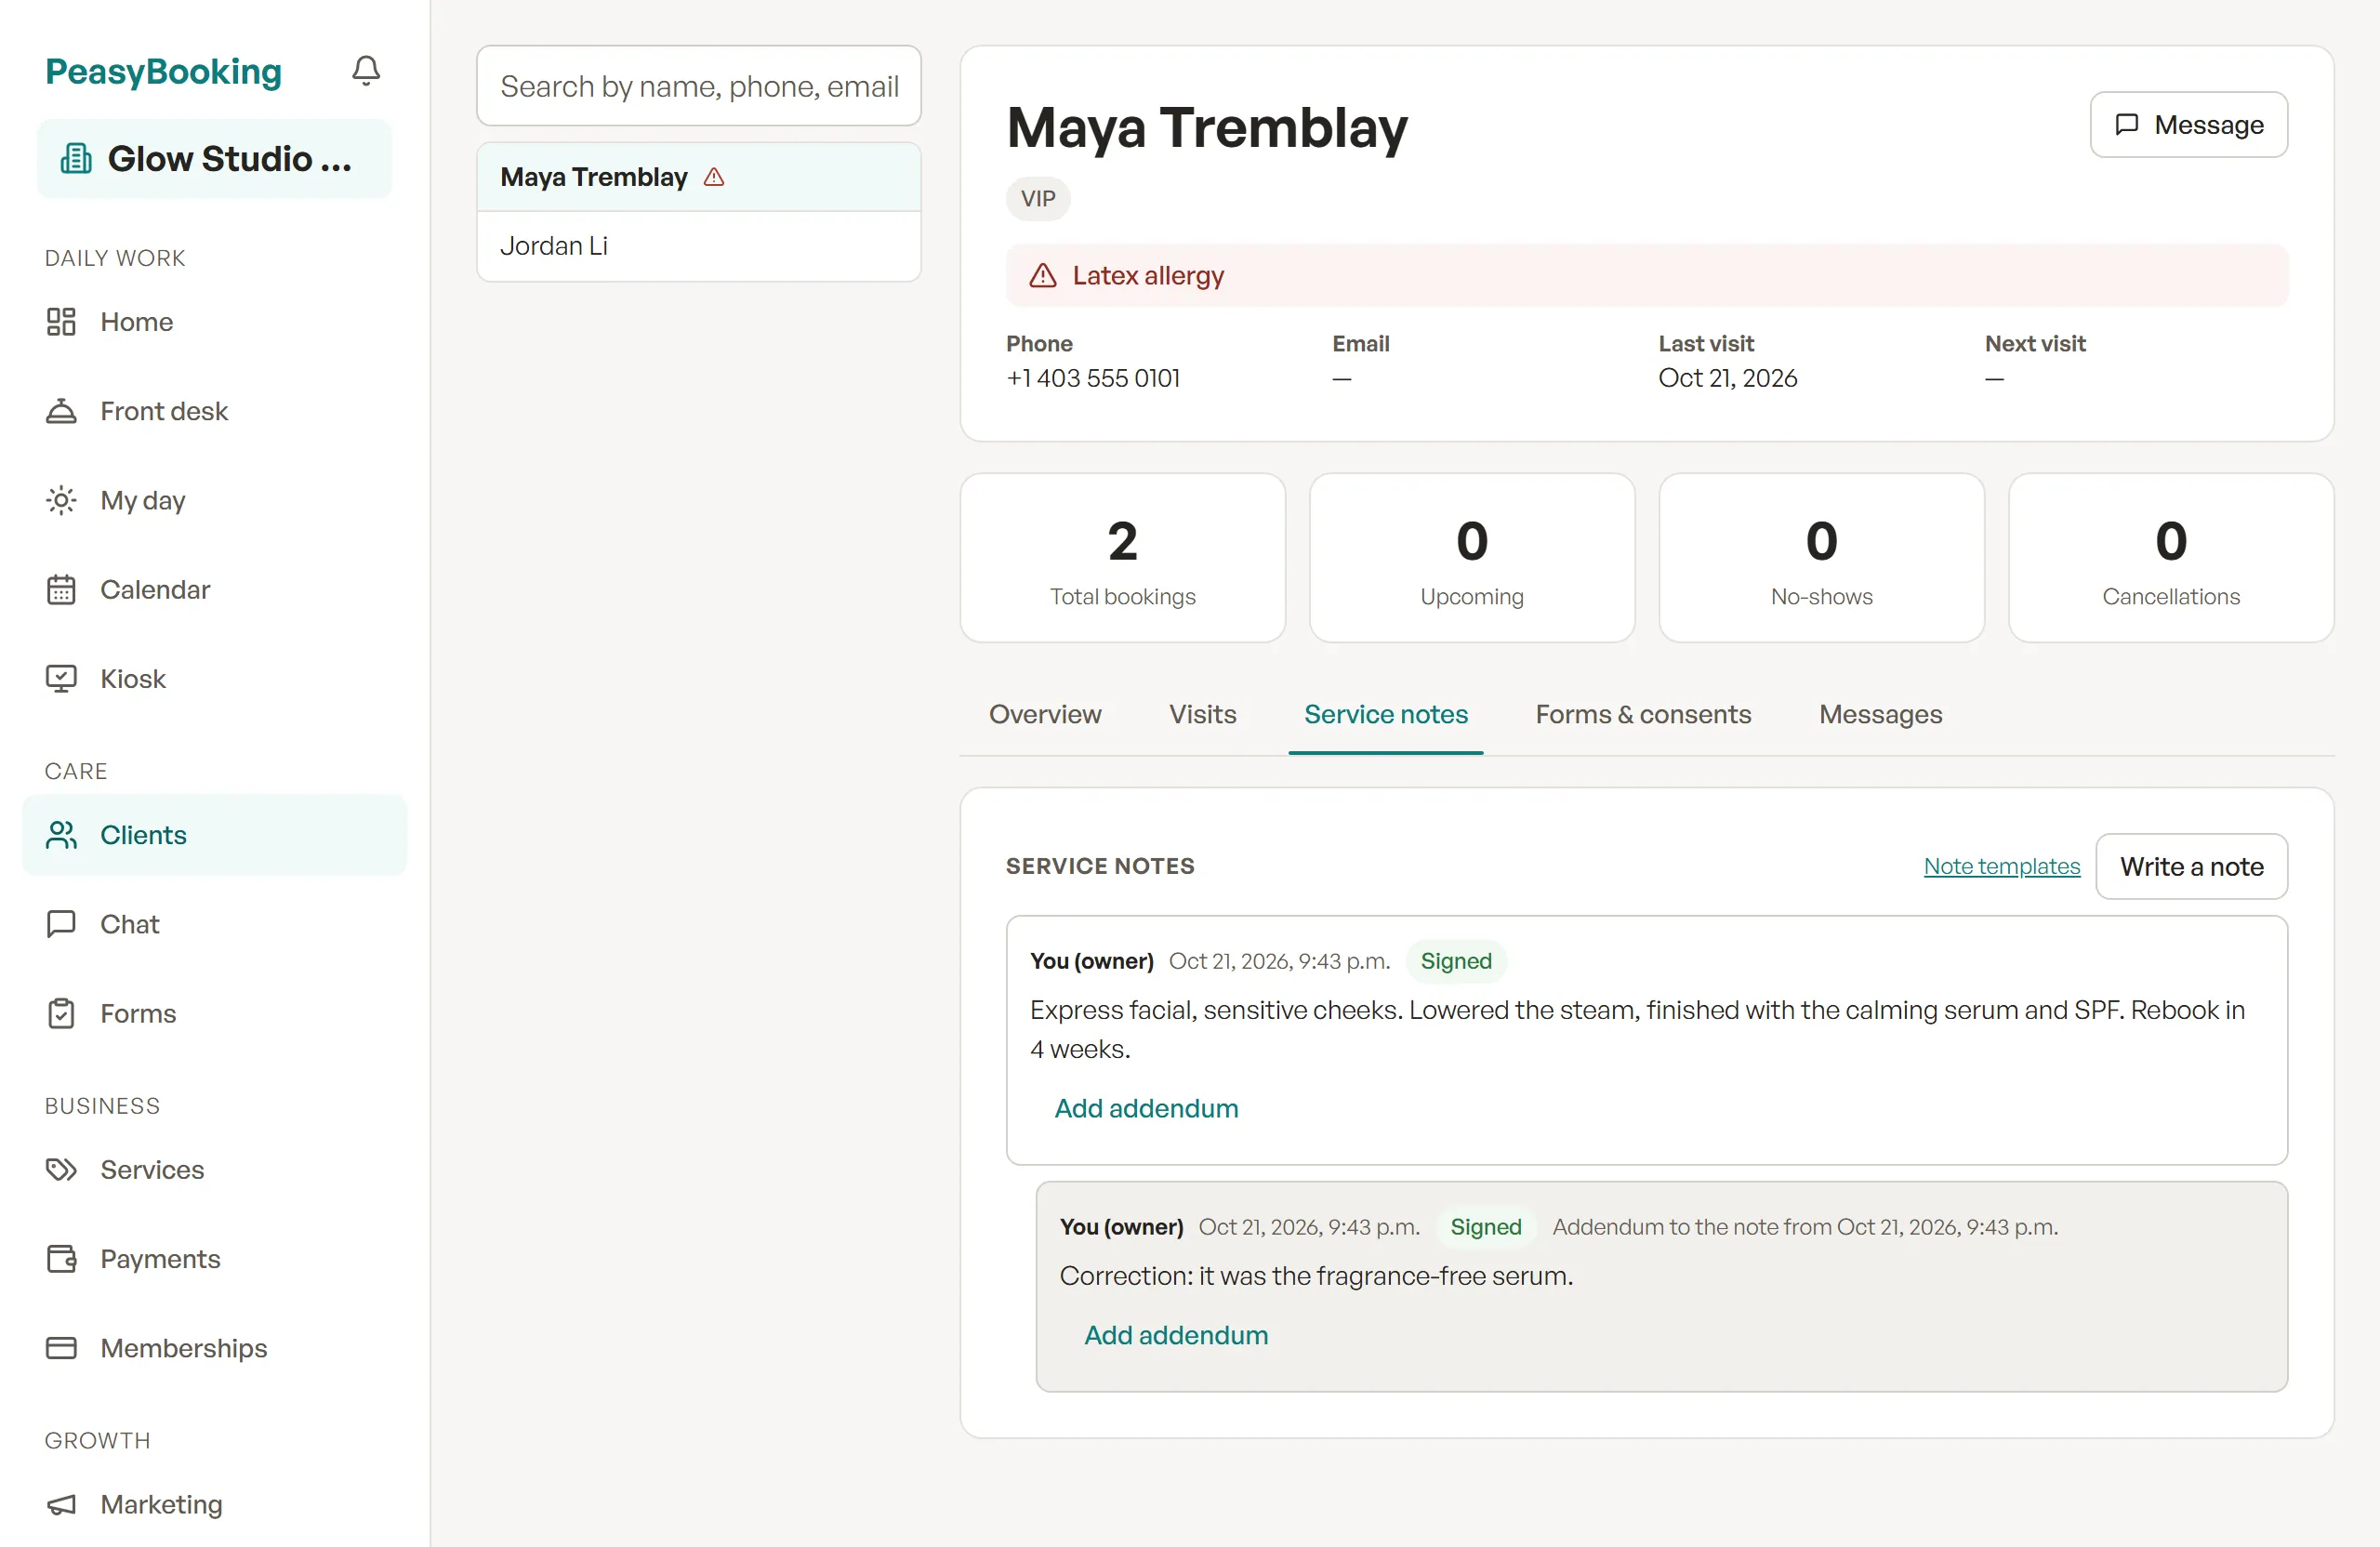
Service notes — a signed note is locked; a correction goes in an addendum underneath it.
Service notes are short per-visit notes on what you did and what you used — the products, the settings, how it went, and what to do next time — signed by the person who did the work. They’re notes on the service, not health records: keep diagnoses and health history out of them.
Service notes is a module you turn on under Settings → Workspace → Modules (it starts on for aesthetics businesses). Notes live on the client profile’s Service notes tab, which lists all of the client’s notes newest first, and on each visit’s page, where a note you write is linked to that visit.
Writing and signing a note
- Press Write a note. Choose a Template (or Blank note) and write the note (up to 5,000 characters).
- Press Save draft to come back to it later — a draft is visible only to you, and you can Edit, Sign or Delete draft it.
- Press Save and sign when it’s final. A signed note is locked: nobody, owners included, can edit or delete it. Fields a template marks with * must be filled before you can sign.
- To correct or add to a signed note, press Add addendum. The addendum is signed in turn and shows beneath the original, marked “Addendum to the note from” and the original’s date.
Sketches and area maps
A note can carry up to four drawings. Add sketch gives you a blank canvas; Add area map gives you an outline — face (front, left side, or right side) or body (front or back) — to mark the areas you worked on. Draw with a finger, stylus or mouse, choose a width and colour, use Mark to drop a labelled marker, and Undo or Clear as you go.
Note templates
Available on: Starter+· owners and managers manage templates
Templates are the checklists, choices and outlines your team fills in for a service. Open them from the Note templates link at the top of the Service notes tab. Press New template and add fields — Heading, Text, Checklist, Choice, Sketch, or Area map — marking text and choice fields Required before signing where you need them; or press Add starter templates for ready-made ones (Facial, Dermaplaning, Laser hair removal, Lash & brow, and Waxing). Editing a template never changes notes already written, and you can Archive one you no longer use.
Who sees what
Owners, managers and staff write notes. Staff see only their own clients’ notes; receptionists can read signed notes but not write them. On the Free plan, notes you’ve already written stay readable, and writing new ones is included from Starter up. Every time someone reads, writes or signs a note it’s recorded in the access log.
10. Services & pricing
Available on: All plans
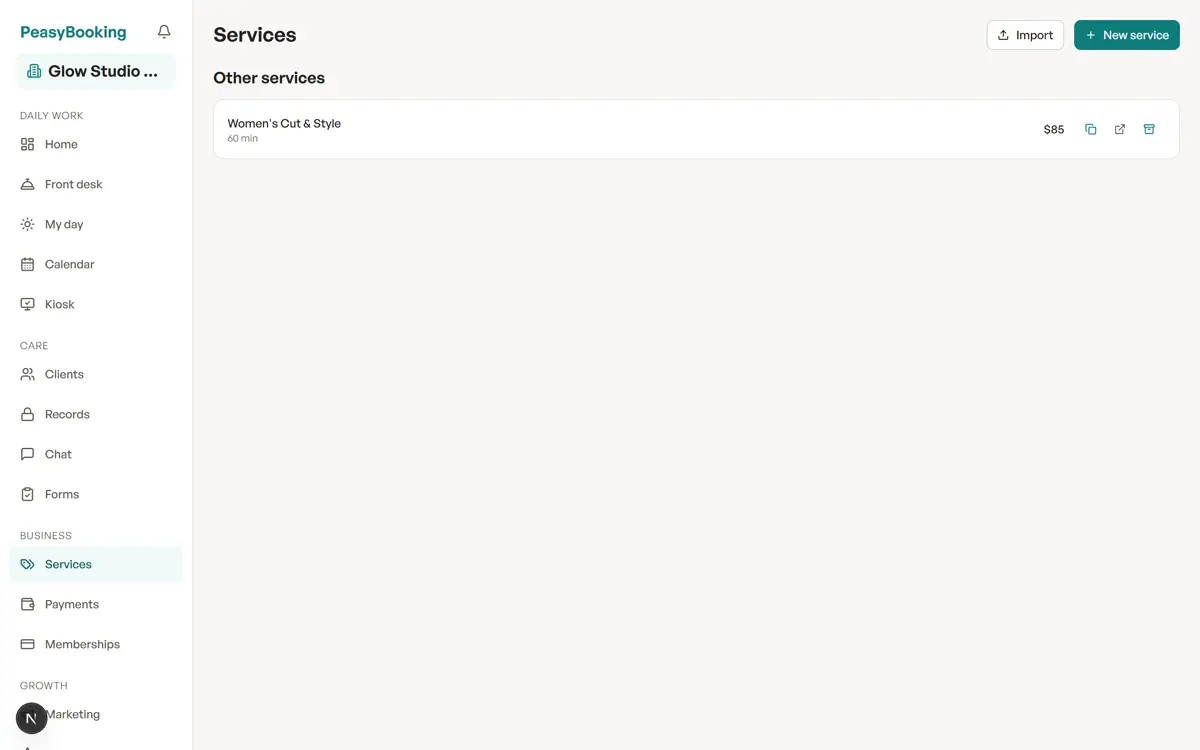
Services — name, duration, price, buffers, add-ons, and per-staff overrides.
A service is anything a client can book: a haircut, a facial, a massage. Your services power the calendar, your booking page, and your prices, so this is the first thing to set up. To add one:
- Click Services in the left menu.
- Click New service. The editor opens as a full page — on a wide screen your service list stays beside it, and All services takes you back.
- On the Details tab, enter the Service name, Duration (min), and Price ($), and pick an optional Category. Owners and managers can choose New category… at the bottom of that list to name a new one on the spot (typing the name of a category you already have reuses it).
- Choose Bookable online or In-house only, then click Create service.
Your service list is grouped by category, with anything uncategorised under Other services. The editor’s other tabs — Staff, Add-ons, Resources, and Packages (a pointer to the Memberships page, where packages and memberships that include the service are set up) — hold the extras. For each service you can:
- Mark it bookable online (or keep it internal-only).
- Set setup/cleanup buffers (and, for salons, mid-service processing time when the room stays held but the stylist is free).
- Add per-staff overrides so a senior practitioner’s price or duration differs from the default.
- Offer quick add-ons (e.g. “Scalp massage +$10”) that appear as upsells during booking.
- Require a deposit (on plans with payments — Team and up). A deposit is a part of the price the client pays up front to hold the booking. In the editor’s Deposit field choose No deposit, Fixed amount (enter Deposit ($) — it can’t be more than the service price; the editor refuses it), or Percent of price (enter Deposit (%), 1–100). A client booking online pays the deposit before the booking is confirmed; the balance is due at the visit. If the client cancels inside your free-cancellation window the deposit is refunded automatically; after the window it’s kept. If you cancel the appointment, the deposit is always refunded — no exceptions. Services without a deposit are unchanged. A deposit can only be set once online payments are connected. If payments are switched off later, a deposit already on a service stays (you can still remove it), and your booking page shows that service as Call to book — with your location’s phone number when you’ve set one — instead of taking a booking nobody can pay for.
- Each row also has one-tap actions: duplicate a service to start a variant, preview it on your public booking page, or archive it (gone from the catalog and online booking; history and reports keep it).
Resources — rooms, chairs & equipment (Team and up)
If a service needs more than a person — a treatment room, a styling chair, one shared laser — turn on resource scheduling under Settings → Schedules → Resources and add your units (each has a name and a kind: room, chair, station, equipment, or your own). Then, in the service editor’s Resources tab, say what one visit needs (e.g. “one free room”). From that moment the whole platform respects it: times without a free unit simply aren’t offered online, and two staff members can never book the same room at once — the database itself refuses the second booking. The toggle is off by default, so solo businesses never see any of this; turning it off later (or downgrading) instantly returns bookings to people-only scheduling, keeping your configuration saved for when you re-enable it.
11. Classes & group sessions
Available on: Team+
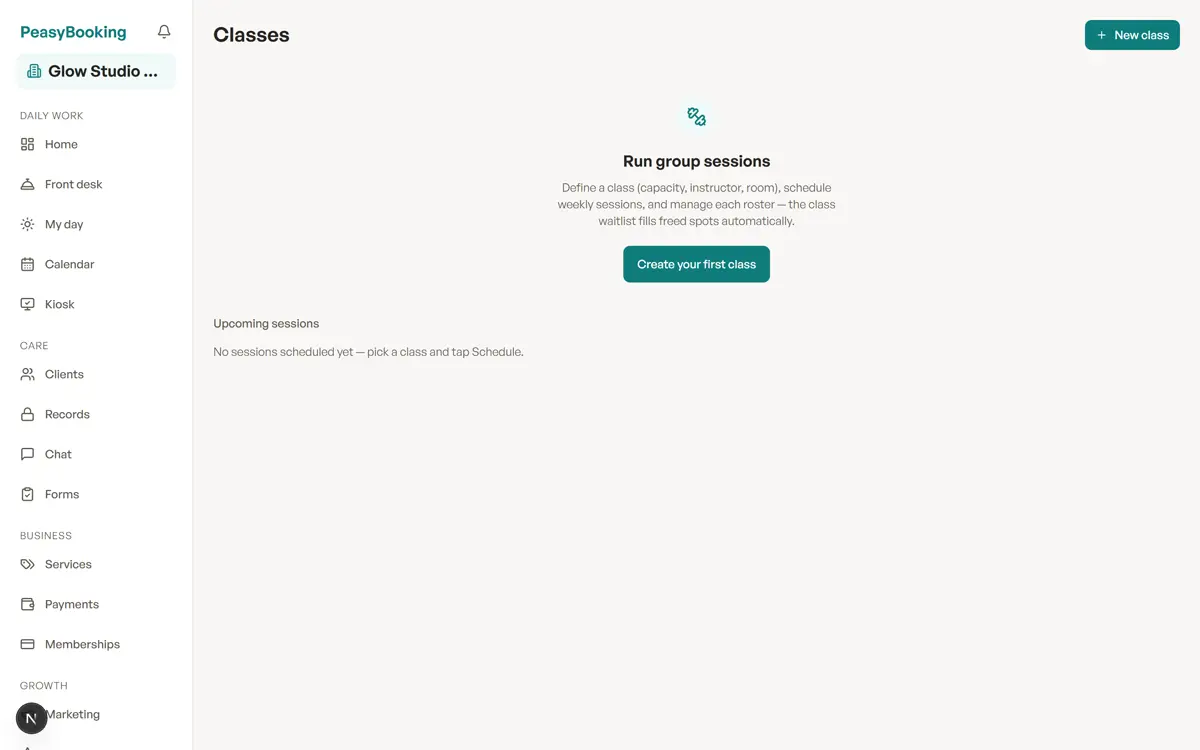
Classes — capacity-based group sessions with an automatic waitlist.
Classes are group sessions with a capacity — yoga, spin, bootcamp — where many clients share one time slot. They live on the Classes page, a workspace module included from the Team plan: it’s on by default for fitness businesses, and any other business can enable it under Settings → Workspace → Modules.
Define a class with New class — its duration, capacity, drop-in price, default instructor and (optionally) a room from your resources. Like services, a class and each session’s roster open as a full page, with your class list beside them on a wide screen (All classes takes you back). Then schedule sessions: pick the first date and time, the instructor, and how many weeks to repeat — each session is created up front, so editing or cancelling one never touches the others.
Rosters and the class waitlist. Each session has its own roster. Adding someone past capacity puts them on the session’s waitlist; when a booked spot frees up, the oldest waitlisted person is promoted automatically and notified by email. Cancelling a session removes everyone, notifies them, and frees the time.
Online class booking. Classes marked “bookable online” appear in a “Book a class” section on your public booking page with live spots-left counts. A full session offers “Join waitlist” instead. Guests get a confirmation email with a manage link where they can cancel — the freed spot goes to the first person in line automatically. No online payment is taken for classes: drop-ins pay at the studio.
Memberships & packages. A class can be marked “included with an active membership” and/or “a package credit covers a spot”. Coverage is applied automatically when a spot is booked (membership first, then one package credit) and shown on the roster and the guest’s confirmation. Cancelling a package-covered spot returns the credit.
Check-in & attendance. On the roster, check attendees in (or mark no-shows) as they arrive; both are undoable. Attendance stays on the class roster — it never touches your 1-1 appointment lifecycle.
Classes respect your 1-1 calendar. A scheduled session blocks the instructor (and the room, if set) for regular appointments — you’ll see it as blocked time on the calendar — and scheduling a session over an existing appointment, class or blocked time is refused with a clear message.
12. Your online booking page
Available on: All plans
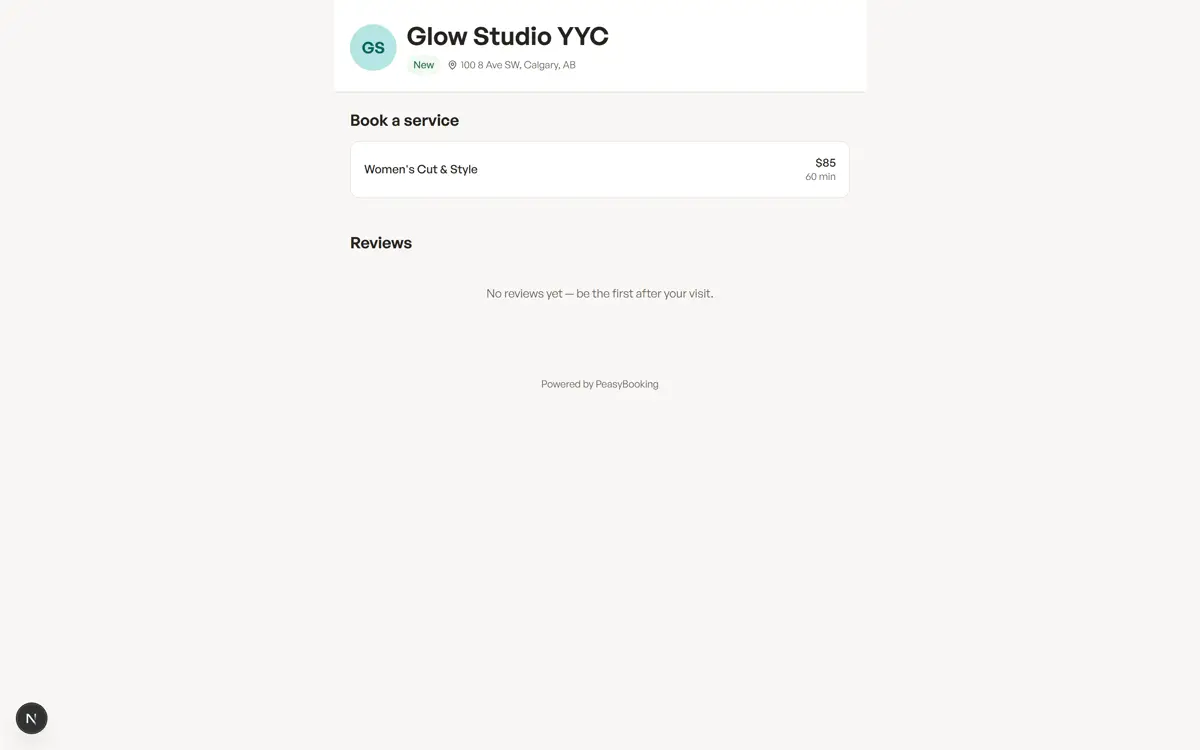
Your public booking page — clients pick a service and a conflict-free time, no account needed.
Every business gets a public booking page (at a /p/your-business link) where clients pick a service, a practitioner, and a time, then book — no app or account required for them. Share the link on your website, social profiles, and email signature.
- Bookings flow straight into your calendar and respect your availability and buffers.
- Clients get a manage link to confirm, reschedule to another open time, or cancel within the policy you set, fill in and sign any forms you require, pay a required deposit, and, after a completed visit, leave a review.
- When nothing fits, a join the waitlist link under the times lets the client leave their contact details and a date window — see Waitlist for how freed slots reach them automatically.
- If you’ve turned on online payments (Team and up), clients can also choose how to pay at this step.
Booking rules — your online-booking policy in one panel
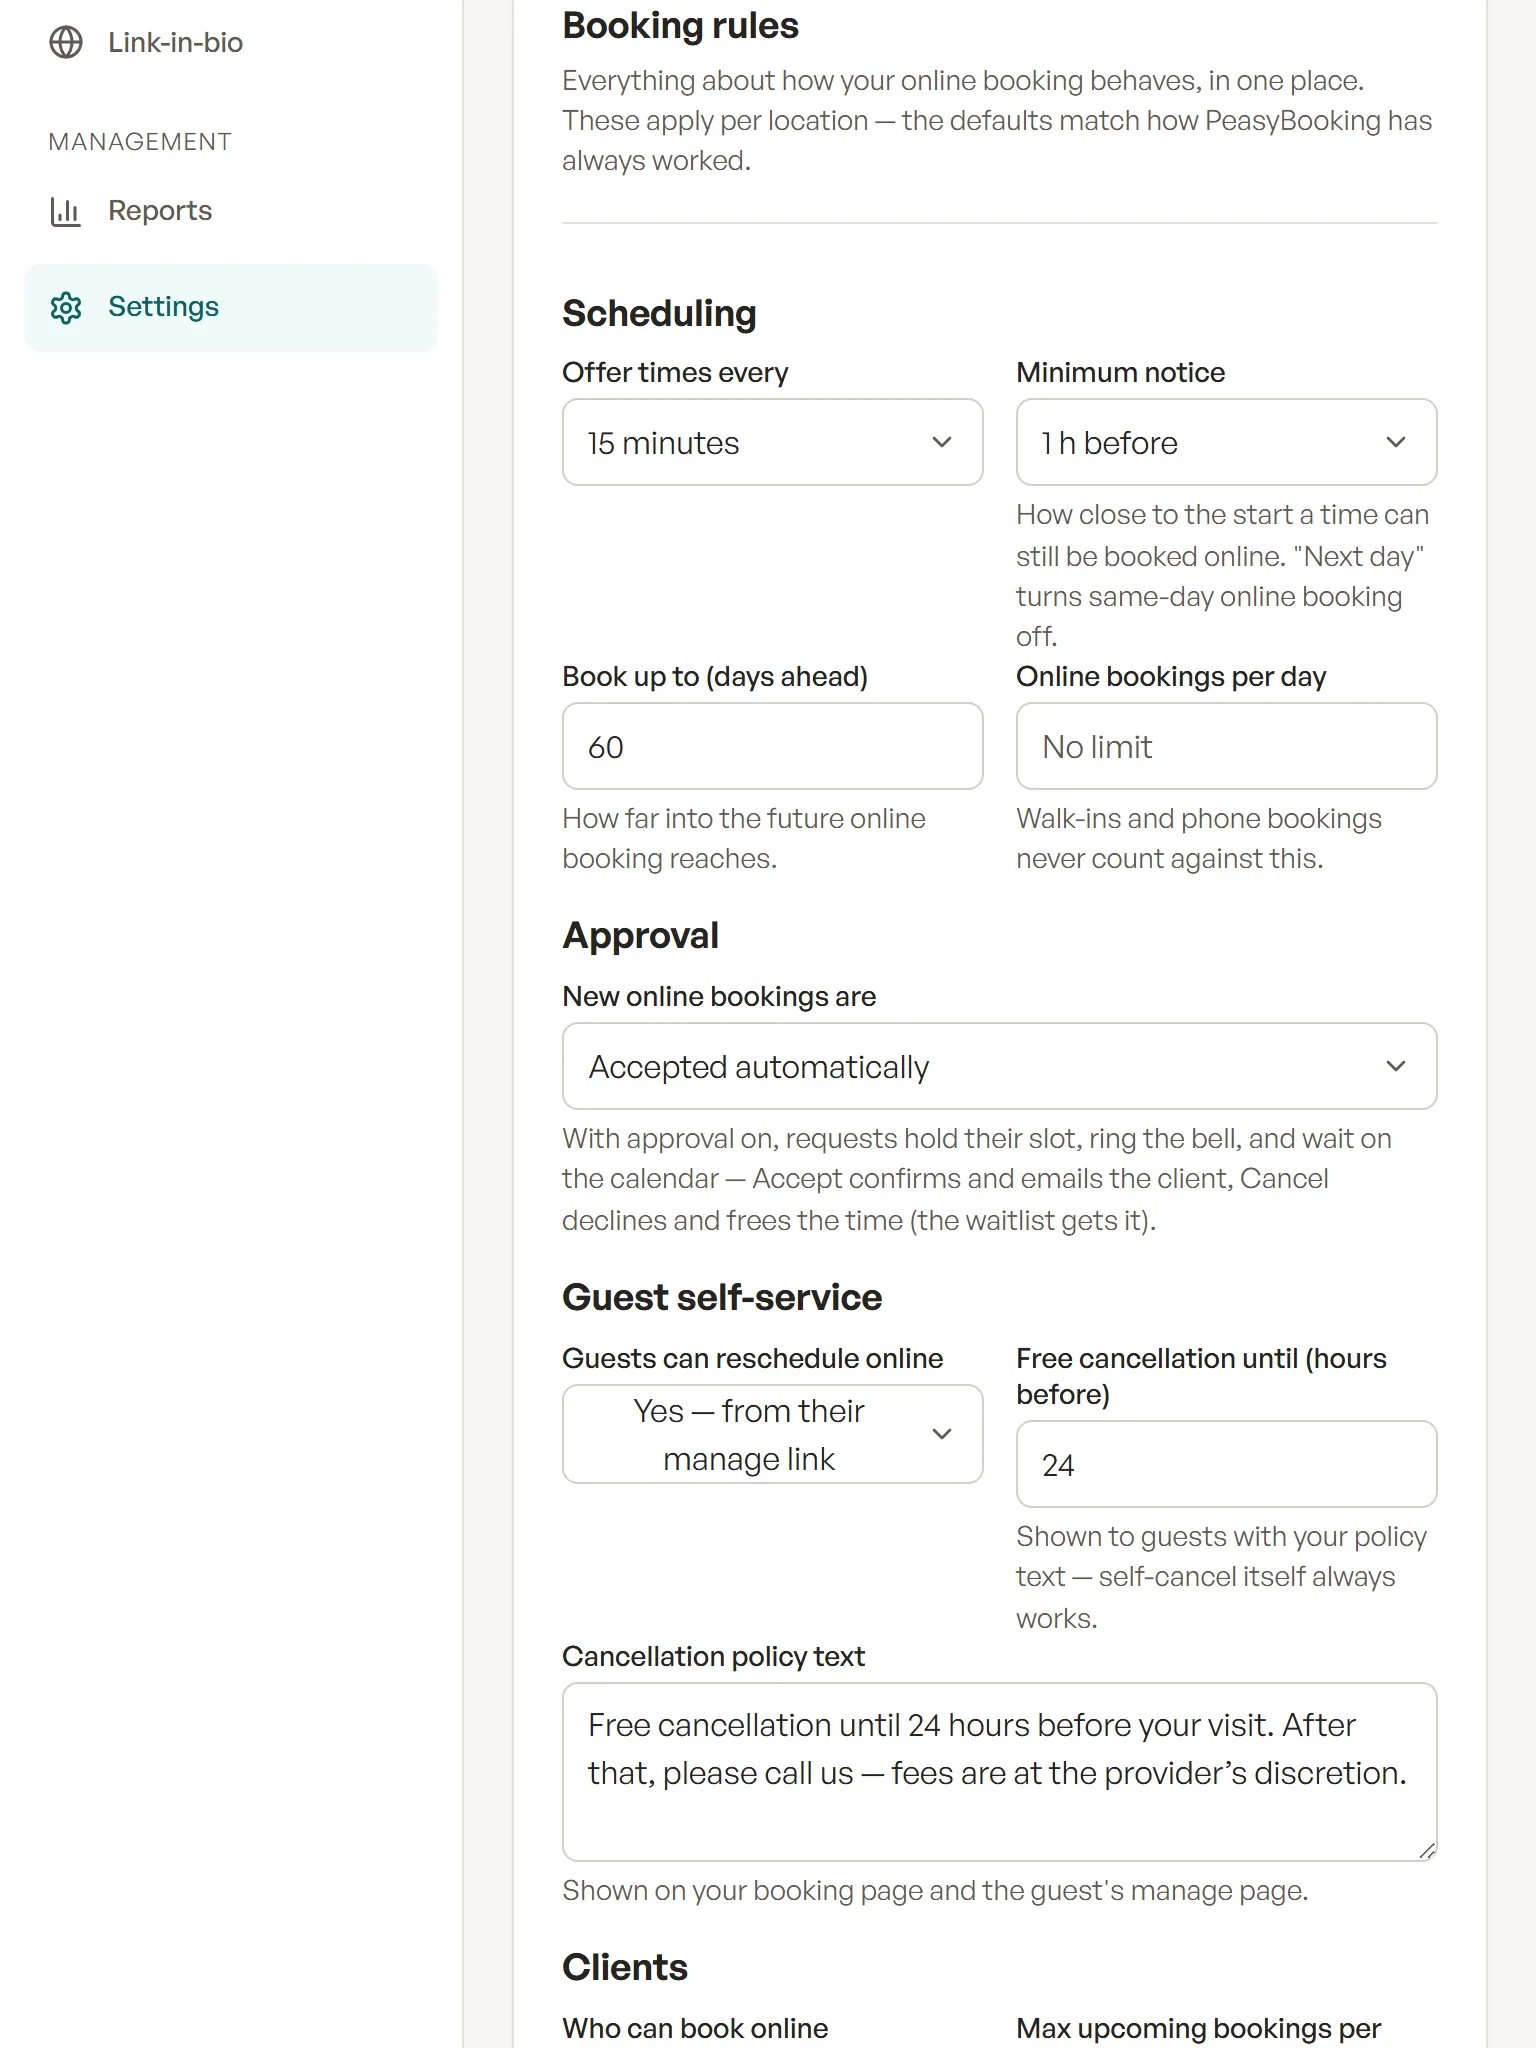
Booking rules (Settings → Schedules) — one panel controls how far ahead clients can book, whether requests need your approval, and how the waitlist behaves.
Settings → Schedules → Booking rules controls how the page behaves, per location: how often times are offered (every 5, 10, 15, or 30 minutes), the minimum notice (pick “next day” to turn same-day online booking off), how far ahead people can book, an optional cap on online bookings per day (walk-ins and phone bookings never count against it), your cancellation policy text and free-cancellation window (shown on your booking page and the guest’s manage page), whether guests may reschedule from their manage link, who can book online — anyone, or existing clients only (matched by the phone or email you have on file; new people are asked to call) — a per-client cap on upcoming bookings (it counts requested, booked, and confirmed visits), and the waitlist offer mode. The defaults are exactly how PeasyBooking has always behaved — change nothing, nothing changes.
Approve each booking — request mode
Set “New online bookings are → Requests” and online bookings stop confirming themselves: the guest sees “Request sent” and gets a “request received” email (no reminders yet), the time is held so nobody else can take it, your bell rings, and the visit sits on the calendar and the Home “Needs attention” list marked requested. Open it and press Accept request — the client gets the normal confirmation and reminders — or Cancel visit to decline, which frees the time (and offers it to the waitlist automatically).
13. Your website & booking link
Available on: All plans
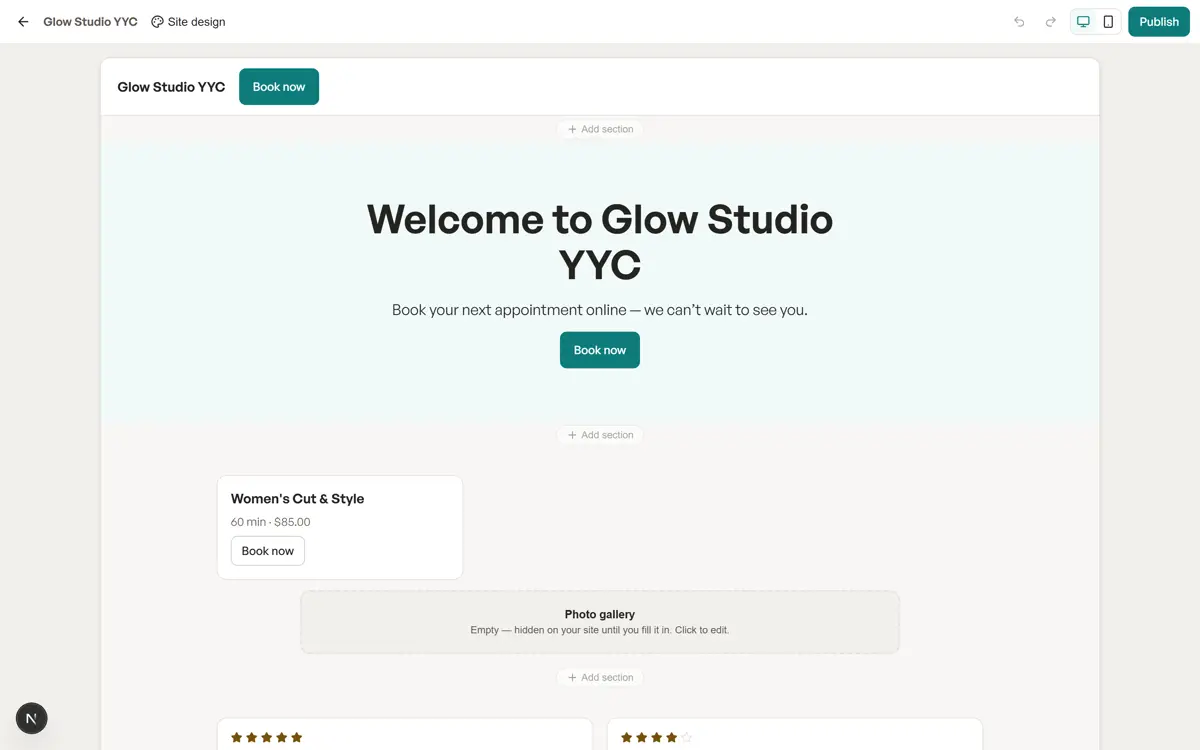
Website Studio (Starter+) — build your site by dragging sections and editing text right on the page.
Publish a single shareable page — your headline, a short bio, social links, and featured services with a Book button — at a peasybooking.com link (your “link in bio” for Instagram, Google, etc.). Edit it under Link-in-bio (in the sidebar’s Growth group): fill in the headline and bio, choose which services to feature, toggle it Published, and use View public page to see it live. It funnels visitors straight to your booking.
Compose your page — sections
Available on: All plans
The Page sections card lets you build the page out of blocks — on every plan, including Free. Add, remove, and reorder: the booking button (with custom text), featured services, an About text block, a photo gallery (up to 8 photos — PNG, JPEG, or WebP, 5 MB each), client reviews, opening hours, and social links. Your name, headline, and bio always stay at the top. Two honest notes: the reviews block only ever shows real reviews from completed visits — you choose whether to show them, never what they say — and the hours block shows your team’s typical weekly hours, while live availability always comes from the booking calendar itself.
To set expectations honestly: on Free this is one composable page. From Starter, the Website Studio (below) turns the same address into your own designed one-page website. Neither is hosted on your own web address (custom domains aren’t supported yet), and every public page carries a small “Powered by PeasyBooking” credit.
Website Studio — the drag-and-drop builder
Available on: Starter+
On any paid plan, Customize your website (on the Link-in-bio page) opens the Website Studio in its own tab: a full-screen editor where you compose your site as one page of drag-and-drop sections, right on the page itself — hover between sections to add one where you want it, and use each section’s toolbar to move, drag, or remove it. Sections include a banner (full or half page, image behind or beside the text), services imported live from your service list (all of them or a hand-picked set, with prices and durations), a photo gallery (grid or carousel), image & text rows, free text, client reviews, opening hours, location & directions, a contact links (visitors tap to email or call you), FAQ, call-to-action bands, YouTube/Vimeo video, and social links. Site-wide design controls set the theme, one of five font presets, button shapes, and your main color. The editor autosaves a draft as you work — nothing changes publicly until you press Publish, which replaces your live site at the same address (existing links keep working, and you can take the site down again any time). Two honest notes: the reviews section shows only real reviews from completed visits, and for safety there’s no raw embed-code section — videos are limited to YouTube and Vimeo, and images must be uploaded to your media library (up to 60 images, 5 MB each).
Make it yours — branding
Available on: Starter+
On any paid plan, the Branding card on the same page lets you customize the look: pick a brand color (preset swatches or any hex value), a light or dark theme, a button shape (rounded, pill, or square), a font style (modern or editorial serif), and upload your logo (up to 2 MB) and a cover image (up to 5 MB) — PNG, JPEG, or WebP. Your logo and brand color also appear on your public booking page and in appointment emails, so clients see one consistent brand everywhere. One honest note: very light brand colors are used sparingly — buttons keep the default color when yours would make white text hard to read.
14. Embedding booking on your site
Available on: All plans
Already have a website — Wix, Squarespace, Webflow, WordPress, or anything else? Add a “Book now” button to it. Under Settings → Billing & add-ons → Booking widget, choose the style (popup button, or inline on the page), set the button text and colour, preview it, then Copy snippet and paste it into your site’s HTML before the closing </body> tag. Clients book in a popup without leaving your page — your services and live availability, right on your own site.
Built with React, Vue, Next.js or an AI site builder? These single-page sites change pages without reloading, and the widget keeps up. For the popup, load the snippet once (in index.html or your root layout). To use your own buttons, give them a data-peasy-book attribute and add data-peasy-target="[data-peasy-book]" to the script tag. They keep opening the popup after every page change, even buttons that appear later. For the inline style, the card shows a small React component to place on your booking page: it renders <div id="peasy-booking"> and loads the script. The calendar appears once each time a visitor opens that page, and loading the script more than once never adds a second button or calendar.
15. Reminders & confirmations
Available on: All plansSMS add-on· Free includes 10 email reminders a month
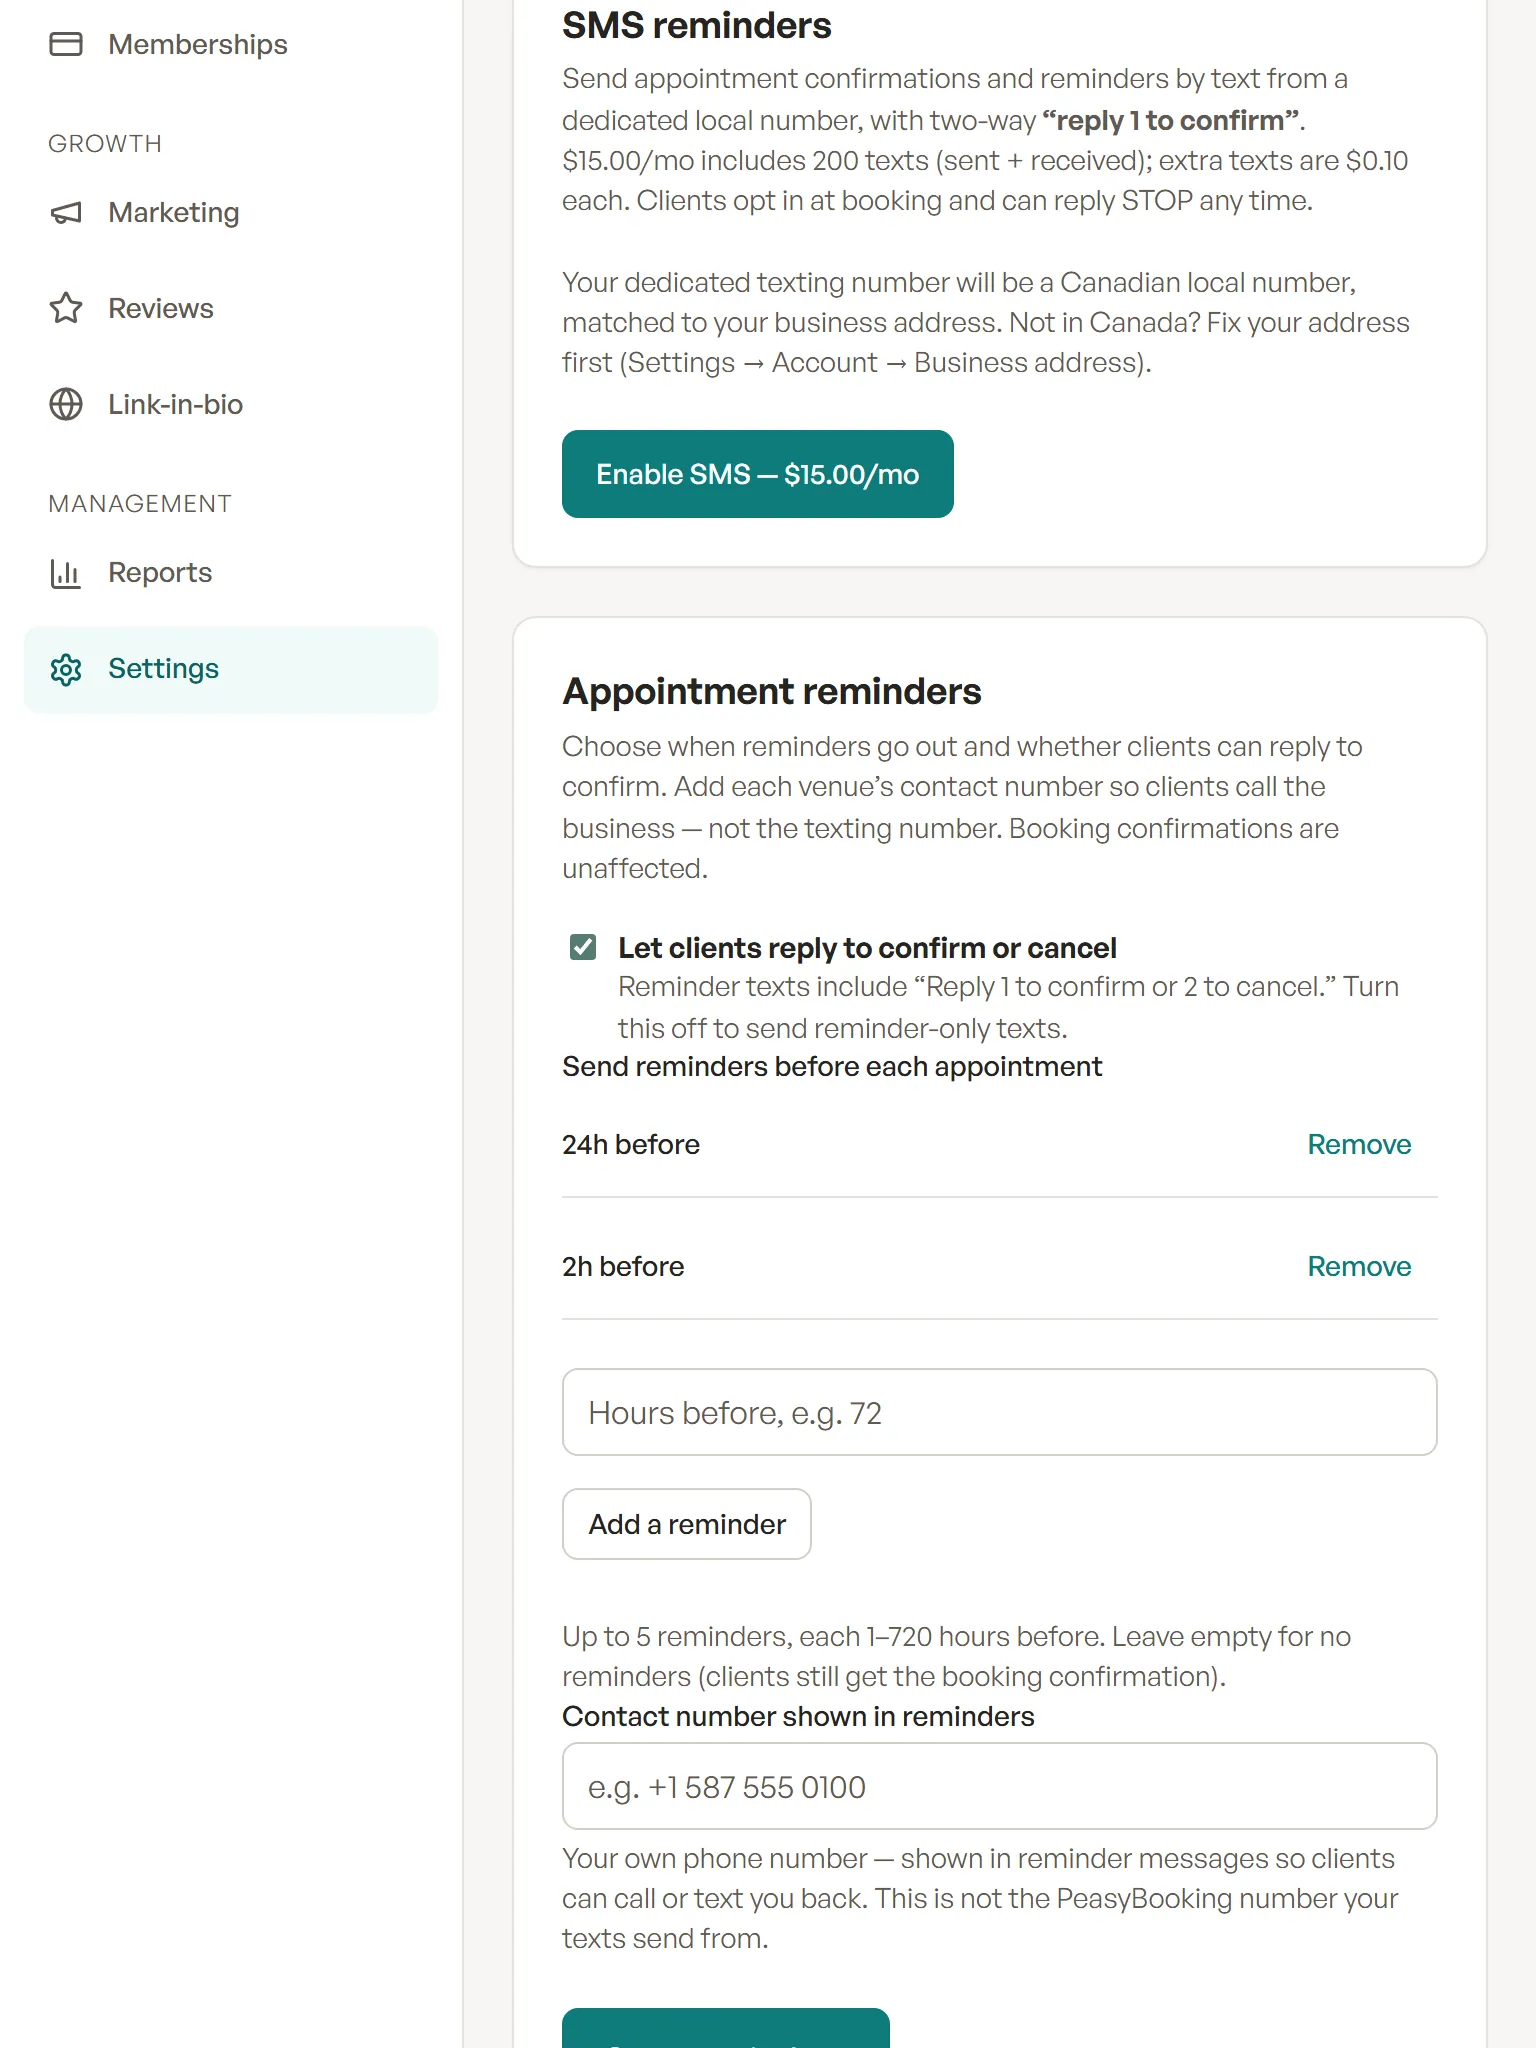
SMS reminders (Settings → Billing & add-ons) — a dedicated local number, up to five scheduled reminders, and “reply 1 to confirm”.
PeasyBooking automatically emails booking confirmations and appointment reminders to reduce no-shows. Confirmations are always unlimited. The Free plan includes 10 email reminders a month — the reminders card shows a running count (for example “3 of 10”) so you always know where you stand, and unlimited reminders are one of the main reasons to move to a paid plan (they’re effectively unlimited for any normal business volume).
Customizing reminders
Available on: All plans· owner only
Tailor how reminders work under Settings → Billing & add-ons → Appointment reminders:
- When they’re sent. Add up to five lead times, each 1–720 hours before the appointment (new accounts start with 24 hours and 2 hours ahead), so clients get a nudge on your schedule.
- Let clients reply to confirm or cancel. Turn on the two-way behaviour so reminder texts invite “Reply 1 to confirm or 2 to cancel.” With it off, reminders are purely informational.
- Contact number. Set a per-location phone number that’s shown in the reminder, so a client with a question calls your front desk directly. This is your own number — distinct from the PeasyBooking number your texts send from.
SMS reminders (add-on)
Available on: Add-on· Canada & the United States
Add text messaging to send confirmations and reminders straight to clients’ phones — the highest-open-rate channel. The add-on is $15/month per business, billed in your business’s currency (CAD in Canada, USD in the United States), and includes 200 messages a month (sent and received combined); beyond that, extra messages are $0.10 each. Turn it on under Settings → Billing & add-ons → SMS reminders (owner only); your business gets its own dedicated local phone number that clients see as the sender and can reply to. SMS is available in Canada and the United States. In the US, carriers require a one-time business registration (called A2P 10DLC) before texting can be switched on — the SMS card walks you through it, and activation completes once it’s approved.
How clients opt in. Texting requires the client’s consent. When someone books online they can tick “Text me appointment reminders,” which records their consent. Every message identifies your business and includes “Reply STOP to opt out”; texting STOP unsubscribes them immediately (and START resumes). Clients who haven’t opted in keep getting email as usual.
Two-way confirmations work exactly as described above once you switch on “Let clients reply to confirm or cancel”: a reply of 1 marks the appointment confirmed and 2 cancels it and frees the slot. Replying is optional. Booking confirmations never ask for a reply — this applies to reminders only.
Usage & billing. The SMS card shows your number, how many of the 200 included messages you’ve used this period, and any overage. It’s billed separately from your plan and can be cancelled anytime (it ends at the end of the current period). Sensitive client details are never sent over SMS — only appointment details.
16. Secure messaging
Available on: Starter+
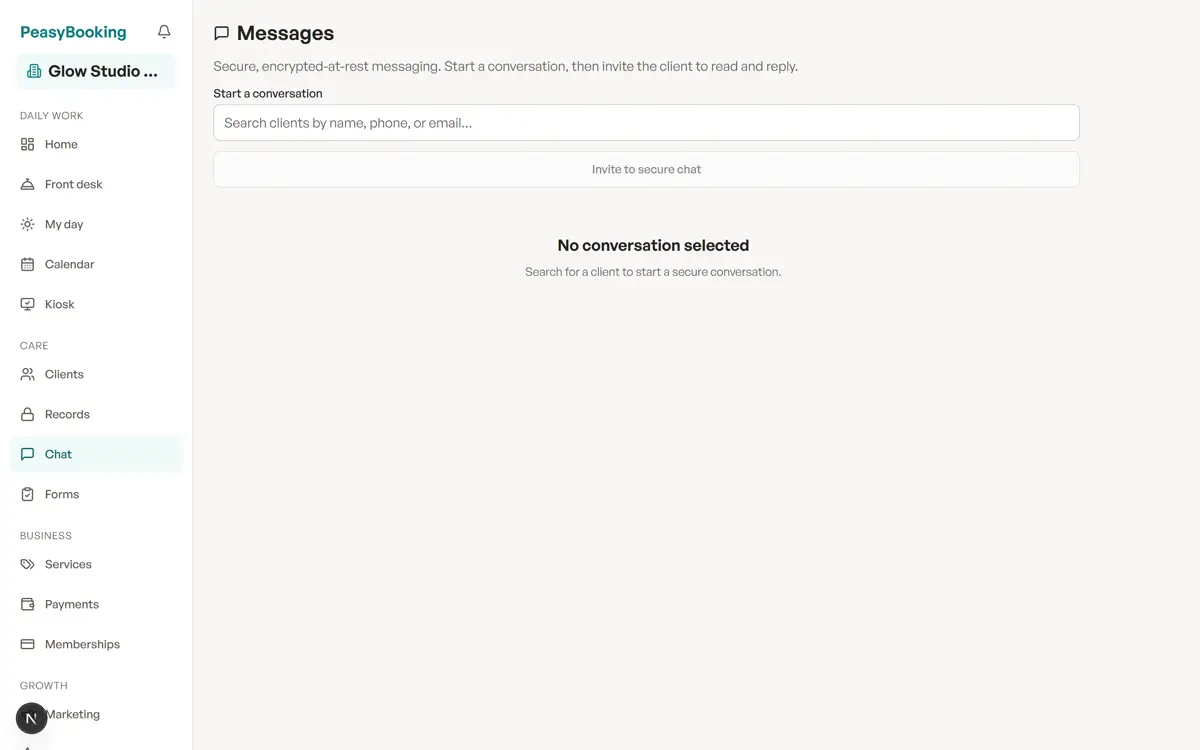
Secure messaging — a shared inbox you can filter, assign, and reply from.
Chat (the page is headed Messages) is secure messaging between your team and clients — encrypted at rest, and handy for follow-ups and questions without sharing personal phone numbers. Unread counts appear on the Chat item in the sidebar. To start a conversation:
- Click Chat in the left menu, then Start a conversation and search for the client.
- Write your message and click Send.
- Click Invite to secure chat to get a secure link for the client — copy it and share it (for example by email). The client opens the link to read and reply; no app or account needed. The conversation stays in one place, tied to their profile.
Chat is also your team’s inbox. The conversation list can be searched and filtered (All / Unread / Mine / Unassigned), and each thread can be assigned to a teammate so it’s clear who’s replying. Beside the open thread, a context panel shows the client’s details and their next and last visit.
- Internal notes — flip the “Internal note” toggle under the composer to leave a note on the thread that only your team can see. The client never receives it, on any device, ever.
- Templates — save your common replies (“Running late”, “Parking directions”) and drop one into the composer with a tap. You can still edit before sending; templates never send anything by themselves.
Secure messaging remains the only channel for sensitive content — the inbox changes how you organize conversations, not where messages travel.
17. Tasks & the notification bell
Available on: All plans
The bell at the top of the sidebar (top-right on phones) has two tabs. To do is the task centre: work that needs a person, kept until someone does it. Updates is the familiar feed — online bookings and booking requests, online class bookings, client cancellations and reschedules, and arrivals.
Tasks appear automatically when the platform sees real work to do:
- A client requests a booking (when you’ve turned auto-accept off in Booking rules) — accepting or declining the request closes the task by itself.
- Intake forms are still missing for a visit in the next 48 hours (if you’ve made forms required) — the task closes itself when the forms arrive.
- A payment link expired unpaid — the task closes itself once the visit’s balance is settled, however you collect it.
- A new review comes in — a nudge to reply while it’s fresh.
You can also add your own tasks (Add task on the Tasks card) and assign any task to a teammate or to a role — “Reception” or “Practitioners”. Every row in the Needs attention card has a one-tap add task button too, so “call this client about their balance” becomes an assignable task in one click. Tasks show on Home and Front desk for the whole team, and each staff member sees the ones aimed at them under My day → My tasks. Ticking the circle marks a task done; nothing ever sends automatically from a task.
18. Payments & checkout
Available on: Team+
Finish a visit and check out — card, cash, or terminal, with tips, memberships, and credits totalled for you.
You can always record payments taken at the front desk — cash, card terminal, or another external method — against an appointment. Tips are supported and tracked separately, and every payment reconciles into your reports and the end-of-day cash-up.
The Payments workspace
The Payments page is organised into tabs:
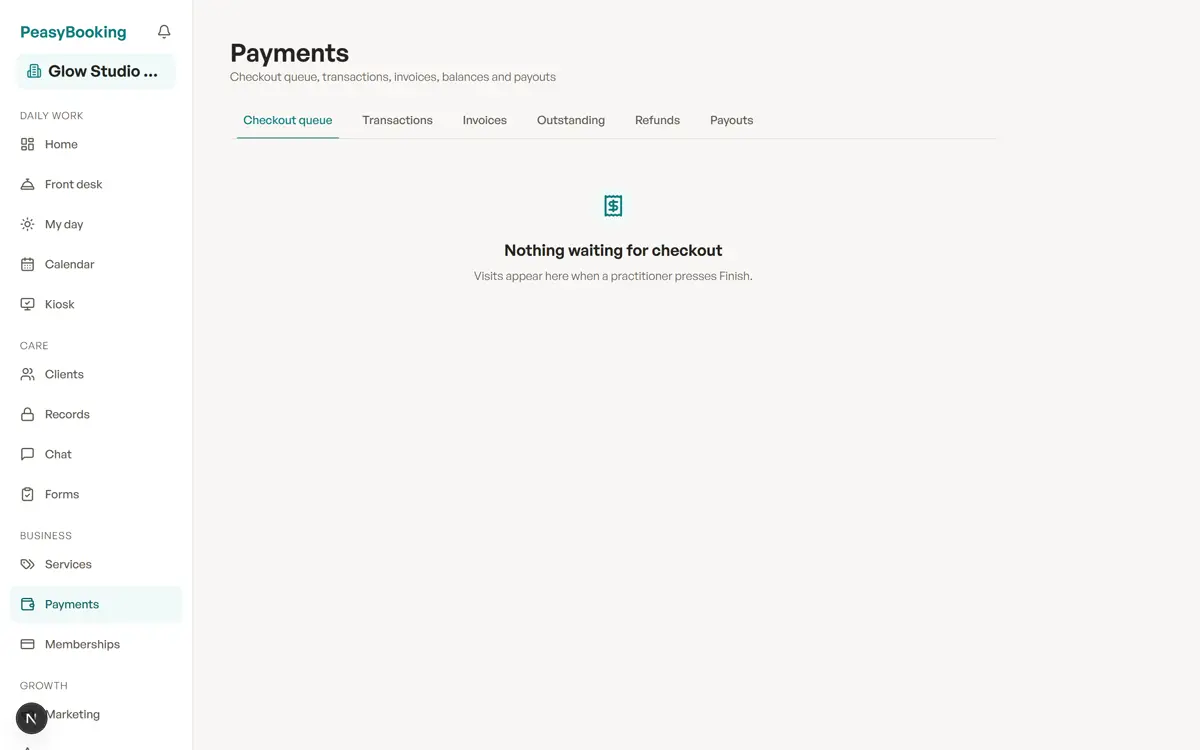
- Checkout queue — visits that are finished but not yet checked out; each row opens the checkout screen.
- Transactions — every money movement on your ledger for the period (payments with their tips, by method).
- Invoices — the payment links you’ve sent, each with its status (open / paid / expired) and a copy button.
- Outstanding — the open-balance list with 7/30/60-day aging, exactly as before; Open checkout replaces the old Settle button and carries the same recording flow plus discounts, credits and tips.
- Refunds — Stripe refunds and voided payments.
- Disputes — card disputes (“chargebacks”) filed by cardholders against your payments, each with its reason, status, and the date evidence is due. This tab is read-only: you respond to a dispute from your own Stripe dashboard.
- Payouts — the status of your connected Stripe account. A payout is Stripe sending your collected card money to your bank. Card payments settle straight to your Stripe account, so payout schedules, bank details and history live in your Stripe dashboard (one click away).
The checkout screen
When a visit is finished (the practitioner presses Finish), it appears as needs checkout on Home, Front desk and My day. Open checkout (from any of those, or from the appointment drawer) brings everything about the visit’s money onto one screen:
- Services & add-ons — the booked services, plus anything sold during the visit (a product, an extra service) added right on the bill.
- Discounts & credits — apply the client’s membership discount, spend a package credit (it covers that service line; any tax charged at booking stays on the bill — add a promotion discount if you want to waive it), or redeem a gift card (counted as a payment under its own method, so your cash-up stays honest).
- Collect payment — cash, terminal, external, or the client’s consented card on file, with a tip field. Partial amounts are fine — collect in as many pieces as you like, or send a payment link for the rest.
Complete checkout marks the visit checked out. If nothing is owed it closes to completed immediately; if a balance remains (partial payment, payment link on its way) it closes automatically the moment that balance settles. After checkout, if the practitioner suggested rebooking, you’ll be prompted to book the next visit — same service, same professional, at the recommended interval — or add the client to the waitlist when nothing fits.
Receipts
Once a visit has a payment, open it on the calendar: the drawer’s Receipts section lists each payment (method and amount, tip included) with two buttons.
- Email receipt sends it to the client’s email on file — or, if there isn’t one, asks where to send it.
- Print receipt opens a printable receipt in a new tab, with a Print / save as PDF button.
A receipt shows your business name, address and phone, the receipt number, when it was paid, the visit, the client, the practitioner, each service and its price, any tip, the total paid, any refund, and the payment method. Owners and managers can add a practitioner’s registration no. (for example a professional licence or association number) in the same section; it’s printed on receipts for the visits they perform. Receipts for past payments stay available even if you later change plans.
Taking payments online (optional)
Online card payments are optional and off by default. To turn them on, go to Settings → Billing & add-ons → Online payments (owner only):
- Read and accept the payments terms — you confirm you’re the merchant of record, that payments settle to your own Stripe account, and that you’re responsible for refunds, chargebacks, and taxes on your sales.
- Connect your own Stripe account — Stripe walks you through a short, secure setup.
Once connected, card payments go straight to your Stripe account and your bank. PeasyBooking never holds or moves your money and takes no cut of what your clients pay you. Your online booking page then lets clients choose how to pay:
- Pay at the venue — the default; nothing is charged online.
- Save a card on file — kept securely with Stripe for a later charge (with the client’s consent).
- Pay now — pay the full amount at the time of booking.
Refunds are issued through Stripe and flow back into your reports automatically. If you don’t connect an account, everything still works — clients simply book and pay at the venue, and you record those payments as above.
Money permissions — who on your team can touch money
Available on: Team+· owner only
By default, only owners can handle money. Anyone without a grant can’t take payments, sell, discount or refund. To let a teammate handle money:
- Go to Settings → Money (owner only) and pick the Team member.
- Tick the actions you’re delegating: Take payments, Apply discounts, Void payments, Refund payments, Sell memberships & packages, and Approve above-limit requests.
- Optionally set a per-transaction limit (blocks any single action above it) and a daily limit (blocks once the day’s total would exceed it) for taking payments, discounts, refunds and sales. Leave a field blank for no limit. Click Save limits.
When a teammate goes over their limit at checkout, they see Above your limit and can press Request approval; the request appears on Home under Approvals needed for the owner or anyone allowed to approve. Owners are always unlimited — you can’t lock yourself out of your own till.
19. Memberships, packages & gift cards
Available on: Essential+
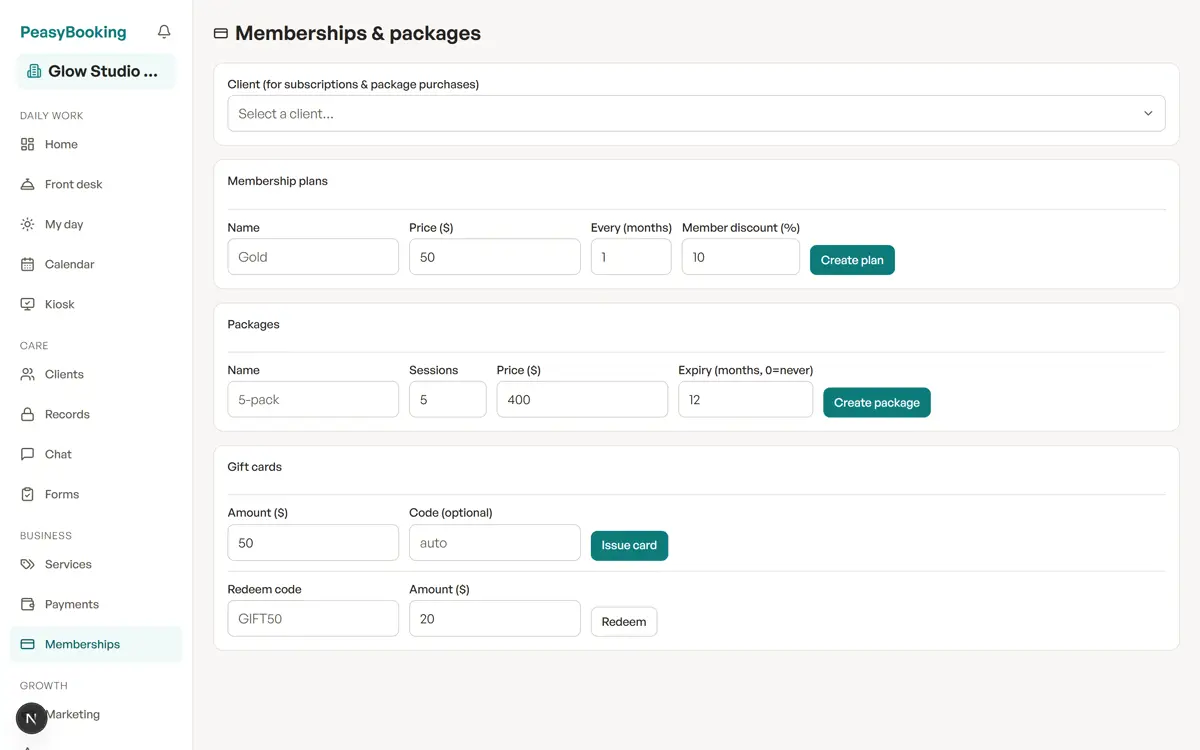
Memberships & packages — what you sell, listed with counts, and a gift-card ledger that shows what each card has left.
The Memberships & packages page sells three kinds of repeat business: memberships (a price billed automatically every so many months, usually with a member discount), packages (a pre-paid bundle of sessions the client uses up over time), and gift cards. Checkout redeems all three automatically, so your cash-up stays honest. Each kind is listed with a count (for example “Packages · 3”), with its create form underneath. Selling needs the Essential plan and the money permission to sell; below Essential the page says Selling is on the Essential plan, but package credits and gift cards you’ve already sold can still be redeemed.
Membership plans
- Click Memberships in the left menu.
- Under New membership plan, enter a Name (e.g. “Gold”), the Price ($), Every (months) for the billing rhythm, and an optional Member discount (%) applied at checkout. Click Create plan.
- To enrol a client: pick them in the Client selector at the top of the page, then click Subscribe on the plan. Their subscription shows under Subscriptions, where you can Pause or Cancel it. Recurring billing uses your connected Stripe account, so set up online payments first.
Packages
- Under New package, enter a Name (e.g. “5-pack”), the number of Sessions, the Price ($), and an Expiry (months, 0=never). Click Create package.
- To sell one: pick the client at the top, record the Payment source — Cash, External (e-transfer, terminal), or Complimentary (no charge) — and a Reason / note (required), then click Sell on the package. The source is recorded on the liability so reporting can tell paid value from a comp.
- The client’s remaining credits show under Package credits; checkout spends them automatically (or press Redeem 1 by hand).
Gift cards
- Under Issue a gift card, enter the Amount ($) and an optional Code (leave it blank and one is generated). Record the Payment source — Cash, External, or Complimentary — and a Reason / note, then click Issue card.
- Give the code to the customer right away — it will not be shown again.
- To redeem: enter the Redeem code and the amount, and click Redeem — at checkout it counts as a payment under its own method.
The Gift cards ledger lists every card you’ve sold — by a short card number, never its code — with the date issued, its status (Active, Used up, or Voided), and what was Issued, Redeemed, Refunded (value returned to the card when a visit it paid for was refunded), Voided, and Remaining — what customers can still spend, which is what you owe in services. A total row sums each column per currency. (Teammates with the Staff role see a simpler list of card balances.)
One honest bookkeeping note: unused package sessions and unspent gift-card balances are services you still owe. The Memberships & stored value report tracks exactly what’s outstanding.
20. Marketing, campaigns & promo codes
Available on: Team+
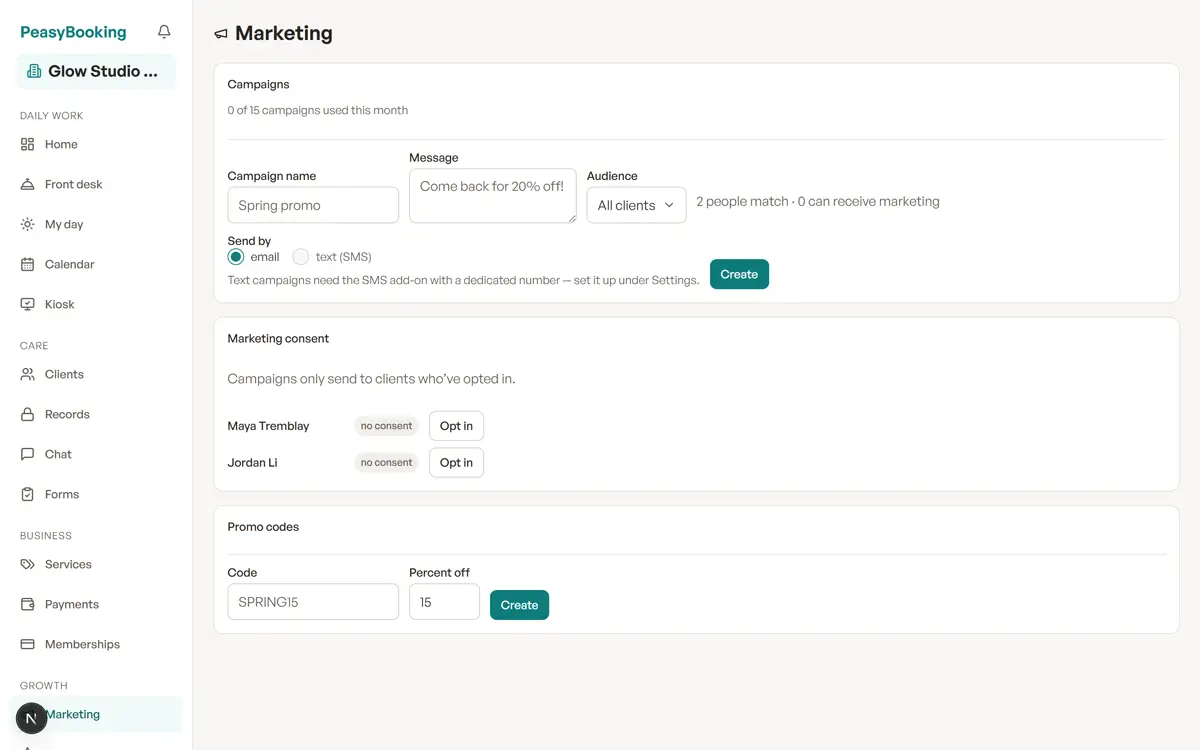
Every send asks first — it tells you exactly who will get the campaign before anything goes out.
A campaign is one message — a promotion, an announcement, a re-engagement nudge — sent to a group of clients at once. Send them from the Marketing area, by email or text (text campaigns send from your dedicated number, so they need the SMS add-on). Crucially, campaigns only send to clients who’ve opted in to marketing — this is kept separate from transactional reminders and confirmations, which always send. Manage each client’s marketing consent from the same area (opt in / revoke), and when you send a campaign the results show how many were sent and how many were skipped for no consent. Keeping marketing consent-based is what keeps you onside with anti-spam rules (such as Canada’s CASL).
When you create a campaign you pick its audience: everyone, a client tag, or one of the suggested audiences the platform computes from your real visit history — lapsed (visited before, but not in 90 days), due for rebooking (visited in the last 30 days with nothing booked next), membership ending (paused or cancelled), one visit only (came once, never rebooked), and birthday this month (clients with a birthday on file — an optional field on the client profile). The form previews how many clients match and how many of those have marketing consent, before anything sends. Audiences only choose candidates: consent, quiet hours, and your monthly allowance apply to every send exactly as always.
Each plan includes a monthly campaign allowance — Team 3, Essential 8, Scale 15, Custom unlimited distinct campaigns per calendar month (the page shows a running count, e.g. “0 of 15 campaigns used this month”).
Sending — and never re-sending blindly
- On a new campaign, press Send now…. Nothing goes out yet: a confirmation tells you how many people will get it now, how many already got it and won’t get it again, and how many matches are skipped (no marketing consent, no contact on this channel, or quiet hours).
- Press Send to N people to send — or Cancel. When nobody new would get it, the send button stays off.
- A campaign that has been sent shows when it was sent, and offers Send to new matches… — only people who match now and haven’t had it yet, such as new clients or anyone deferred by the 9 pm–8 am quiet-hours window, again with the same confirmation — and Duplicate, which makes an editable copy to send as a new campaign. There is no plain “Send now” on a sent campaign, so nobody gets the same message twice by accident.
Sending to new matches doesn’t count against your allowance again; a duplicate is a new campaign and counts once it’s sent.
Campaigns of any size send safely in the background — confirm the send and keep working while your list goes out. Text campaigns also come with per-client delivery receipts: the report under each campaign shows how many messages were delivered and how many weren’t, and clicking it expands a per-recipient list — each client by name with their delivery status (delivered, not delivered with the carrier’s reason, still sending, or skipped for missing consent) — so you never have to wonder whether a specific client actually received your message.
Promo codes — discounts clients enter at booking
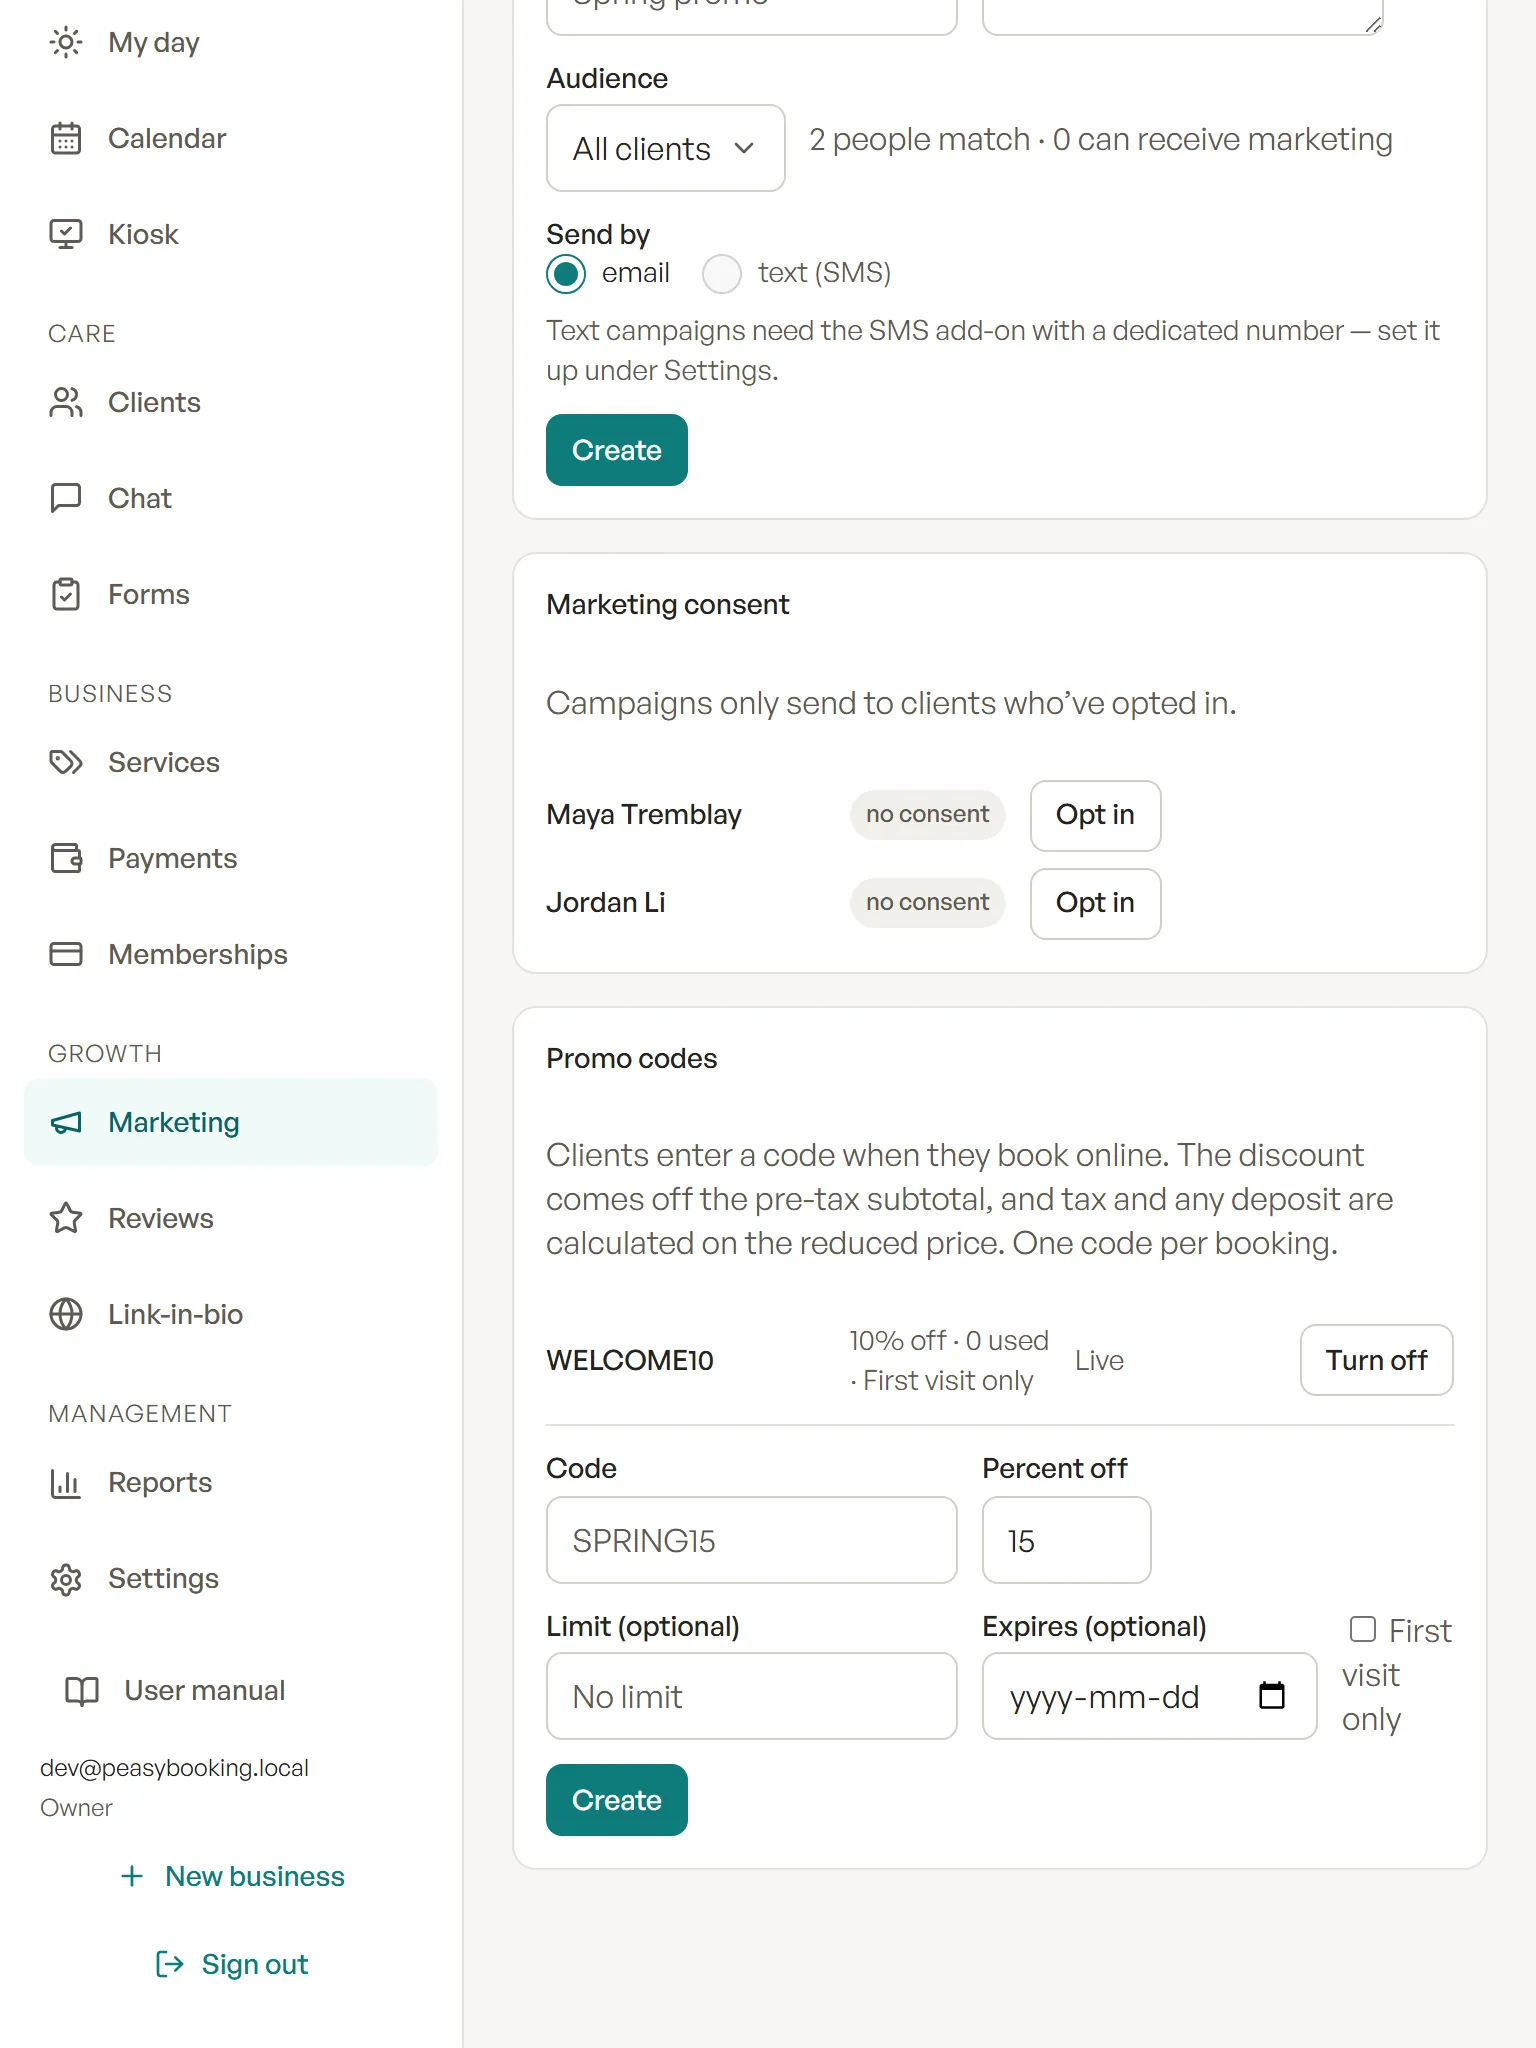
Promo codes — create a code, choose the percent off, and share it; clients type it in when they book online.
A promo code is a short code (like “SPRING20”) a client types in when booking online to get a percentage off. Create them on the same Marketing page:
- Under Promo codes, enter the code and the percent off.
- Optionally set a usage limit (how many bookings can use it), an expiry date, and a first-visit-only flag so it only works for brand-new clients.
- Create it — and deactivate it any time to stop it immediately.
How a code behaves, precisely: the discount comes off the pre-tax subtotal; tax and any deposit are calculated on the reduced price; and one code per booking — a second code is refused, never stacked.
21. Reviews
Available on: Essential+
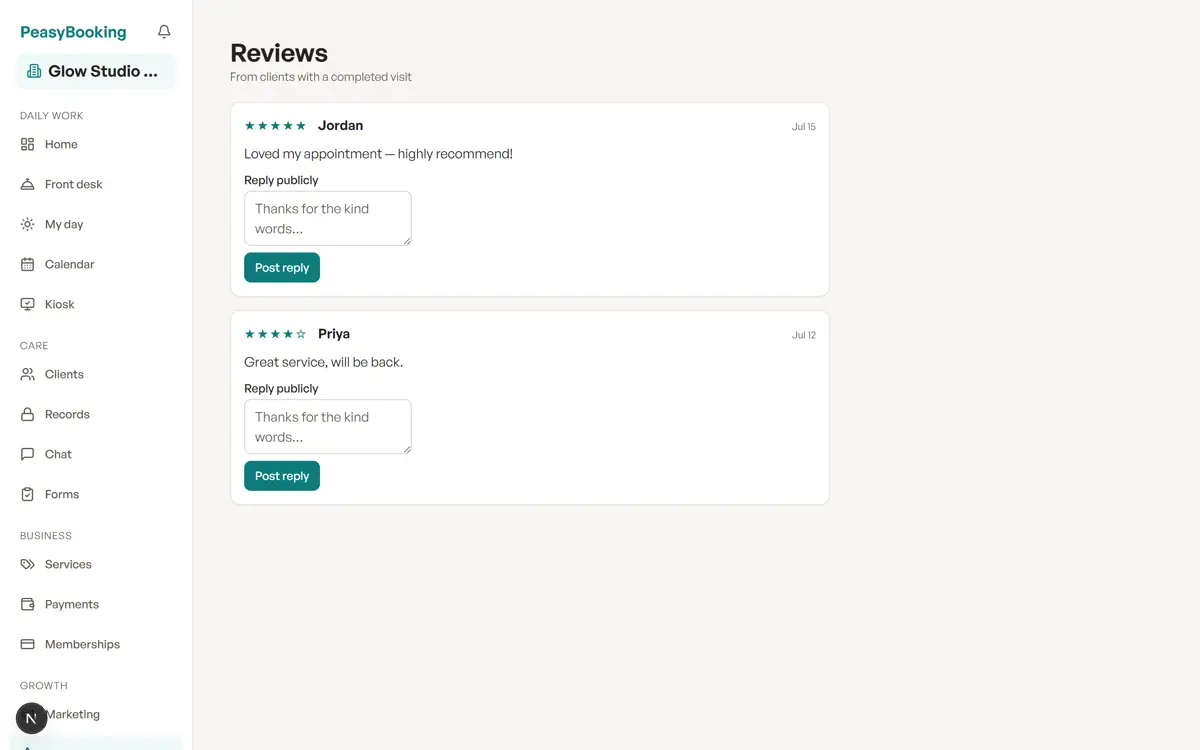
Collect ratings after completed visits, reply publicly, and choose whether they show on your pages.
After a completed visit, a client can leave a star rating and comment from their own booking-management page — only clients with a completed visit can review, so every review is real. To reply:
- Click Reviews in the left menu.
- Find the review, write your response under Reply publicly, and click Post reply.
Your reply shows with the review. You choose whether reviews appear on your website and booking page — but never what they say.
22. Kiosk / self check-in
Available on: Team+
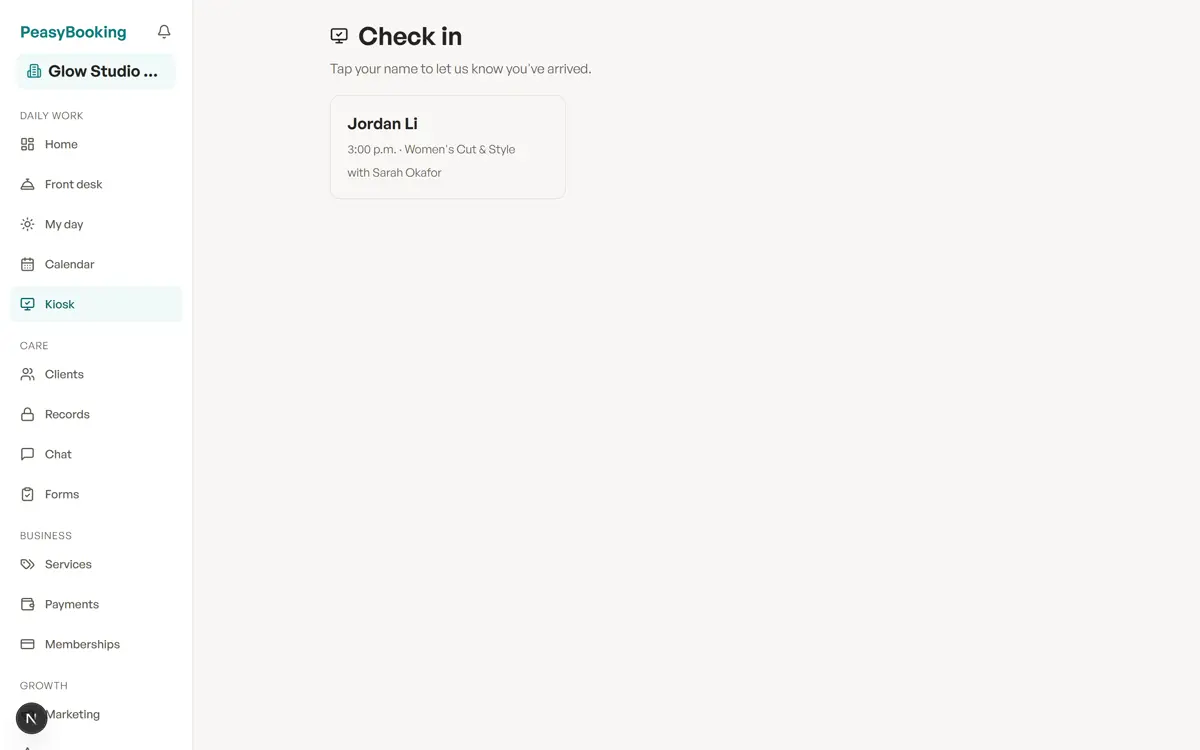
Kiosk — the tablet locks to check-in: no menu, just today's tiles, with Exit kiosk in the corner.
The kiosk is a self check-in screen for a tablet at your front desk, so clients can let you know they’ve arrived without waiting for reception. To use it:
- Enable the Kiosk module under Settings → Workspace if it isn’t in your menu.
- Set a Kiosk PIN under Settings → Workspace (owner or manager): 4–8 digits, typed twice, then Set PIN. You can Change PIN or Remove PIN there later. PeasyBooking stores only a one-way hash of the PIN, never the PIN itself.
- Open Kiosk on the tablet and leave it on that page during the day. It shows today’s appointments as big tap tiles — name, time, service. If you’re an owner or manager and no PIN is set yet, the kiosk first asks you to Set a kiosk PIN before locking this device: type it twice and tap Set PIN and lock, or tap Skip — leaving will need a fresh sign-in. Back to the dashboard leaves without locking anything.
- A client taps their name and sees “You’re checked in” — the same check-in the front desk performs, so the practitioner’s bell gets the same quiet heads-up.
If the client has required forms still missing, the kiosk offers them at check-in (“Form 1 of 2”, with a Do this later option); clients sign on the screen with a finger or stylus.
Kiosk lock mode
Opening Kiosk locks that tablet to the check-in screen: it fills the screen with no menu, and every other page sends the tablet back to check-in — even after a reload — so a client can’t wander into Clients, Payments or Settings. To leave:
- Tap Exit kiosk in the top-right corner. It stays there however far down the list of tiles you scroll. The browser’s Back button doesn’t leave the kiosk.
- Enter the Kiosk PIN and tap Unlock — or choose Sign in again, which signs you out of PeasyBooking on that device. If no PIN has been set, signing in again is the only way out.
The lock belongs to the device’s browser, not to one tab: while it’s on, every PeasyBooking tab and window in that browser opens on the check-in screen, and it stays on after a reload or a restart. So open the kiosk on the tablet you leave at the front desk, not on the computer you work from.
Five wrong PINs in a row lock the PIN for 15 minutes. Signing out also ends the lock. For a public tablet, also turn on your device’s own guided-access/kiosk mode to keep the browser itself on screen.
23. Forms & consents
Available on: All plans
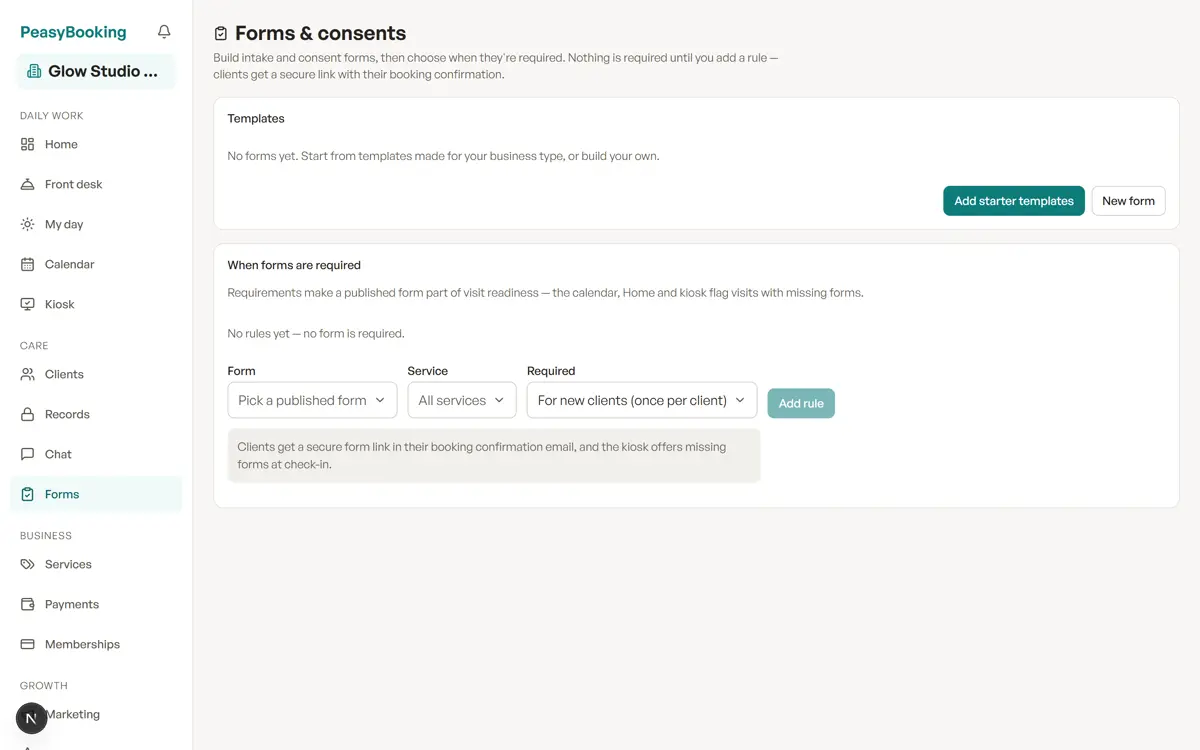
Build intake forms and consents; attach one to a service so it's requested automatically.
Forms lets you build intake and consent forms — waivers, policy acknowledgements, photo consent, emergency contacts — and decide when they’re required. Nothing is required by default: your booking flow doesn’t change until you add a rule.
- Build — start from templates suggested for your business type (Add starter templates) or create your own with text, multiple-choice, checkbox, date, and signature questions. Publish a form to make it usable; editing after publishing creates a new version when you republish, and past submissions always keep the exact questions the client saw.
- Require — add a rule: for new clients, for a specific service, every visit, every year, or until the form changes. Rules can apply business-wide or per service.
- Collect — three ways: clients get a secure form link in their booking confirmation email (the same link they use to manage the booking); the kiosk offers missing forms at check-in; and staff can hand a tablet or phone to the client with Fill on this device (below).
- Sign — a signature question gives the client a box to sign in with a finger, stylus or mouse (Sign here, with Undo and Clear) and asks them to type their full name. On the booking link and at the kiosk the typed name alone still signs; when you hand over your own device, a required signature must be drawn.
- See readiness — visits with missing required forms are flagged in the appointment drawer, on Home under “Needs attention”, and on kiosk tiles.
- Review & export — on the client profile’s Forms & consents tab each submission shows who signed it and how (Sent link, Kiosk, or In person); View shows the answers and signature, and PDF downloads it. The PDF shows every answer, the drawn signature with the typed name, a line saying how and where it was signed (for example “Signed in person on the business’s device. Witnessed by …”), and an answers fingerprint — a code computed from the answers, so any later change to them would show.
Fill on this device — signing in person
Available on: All plans
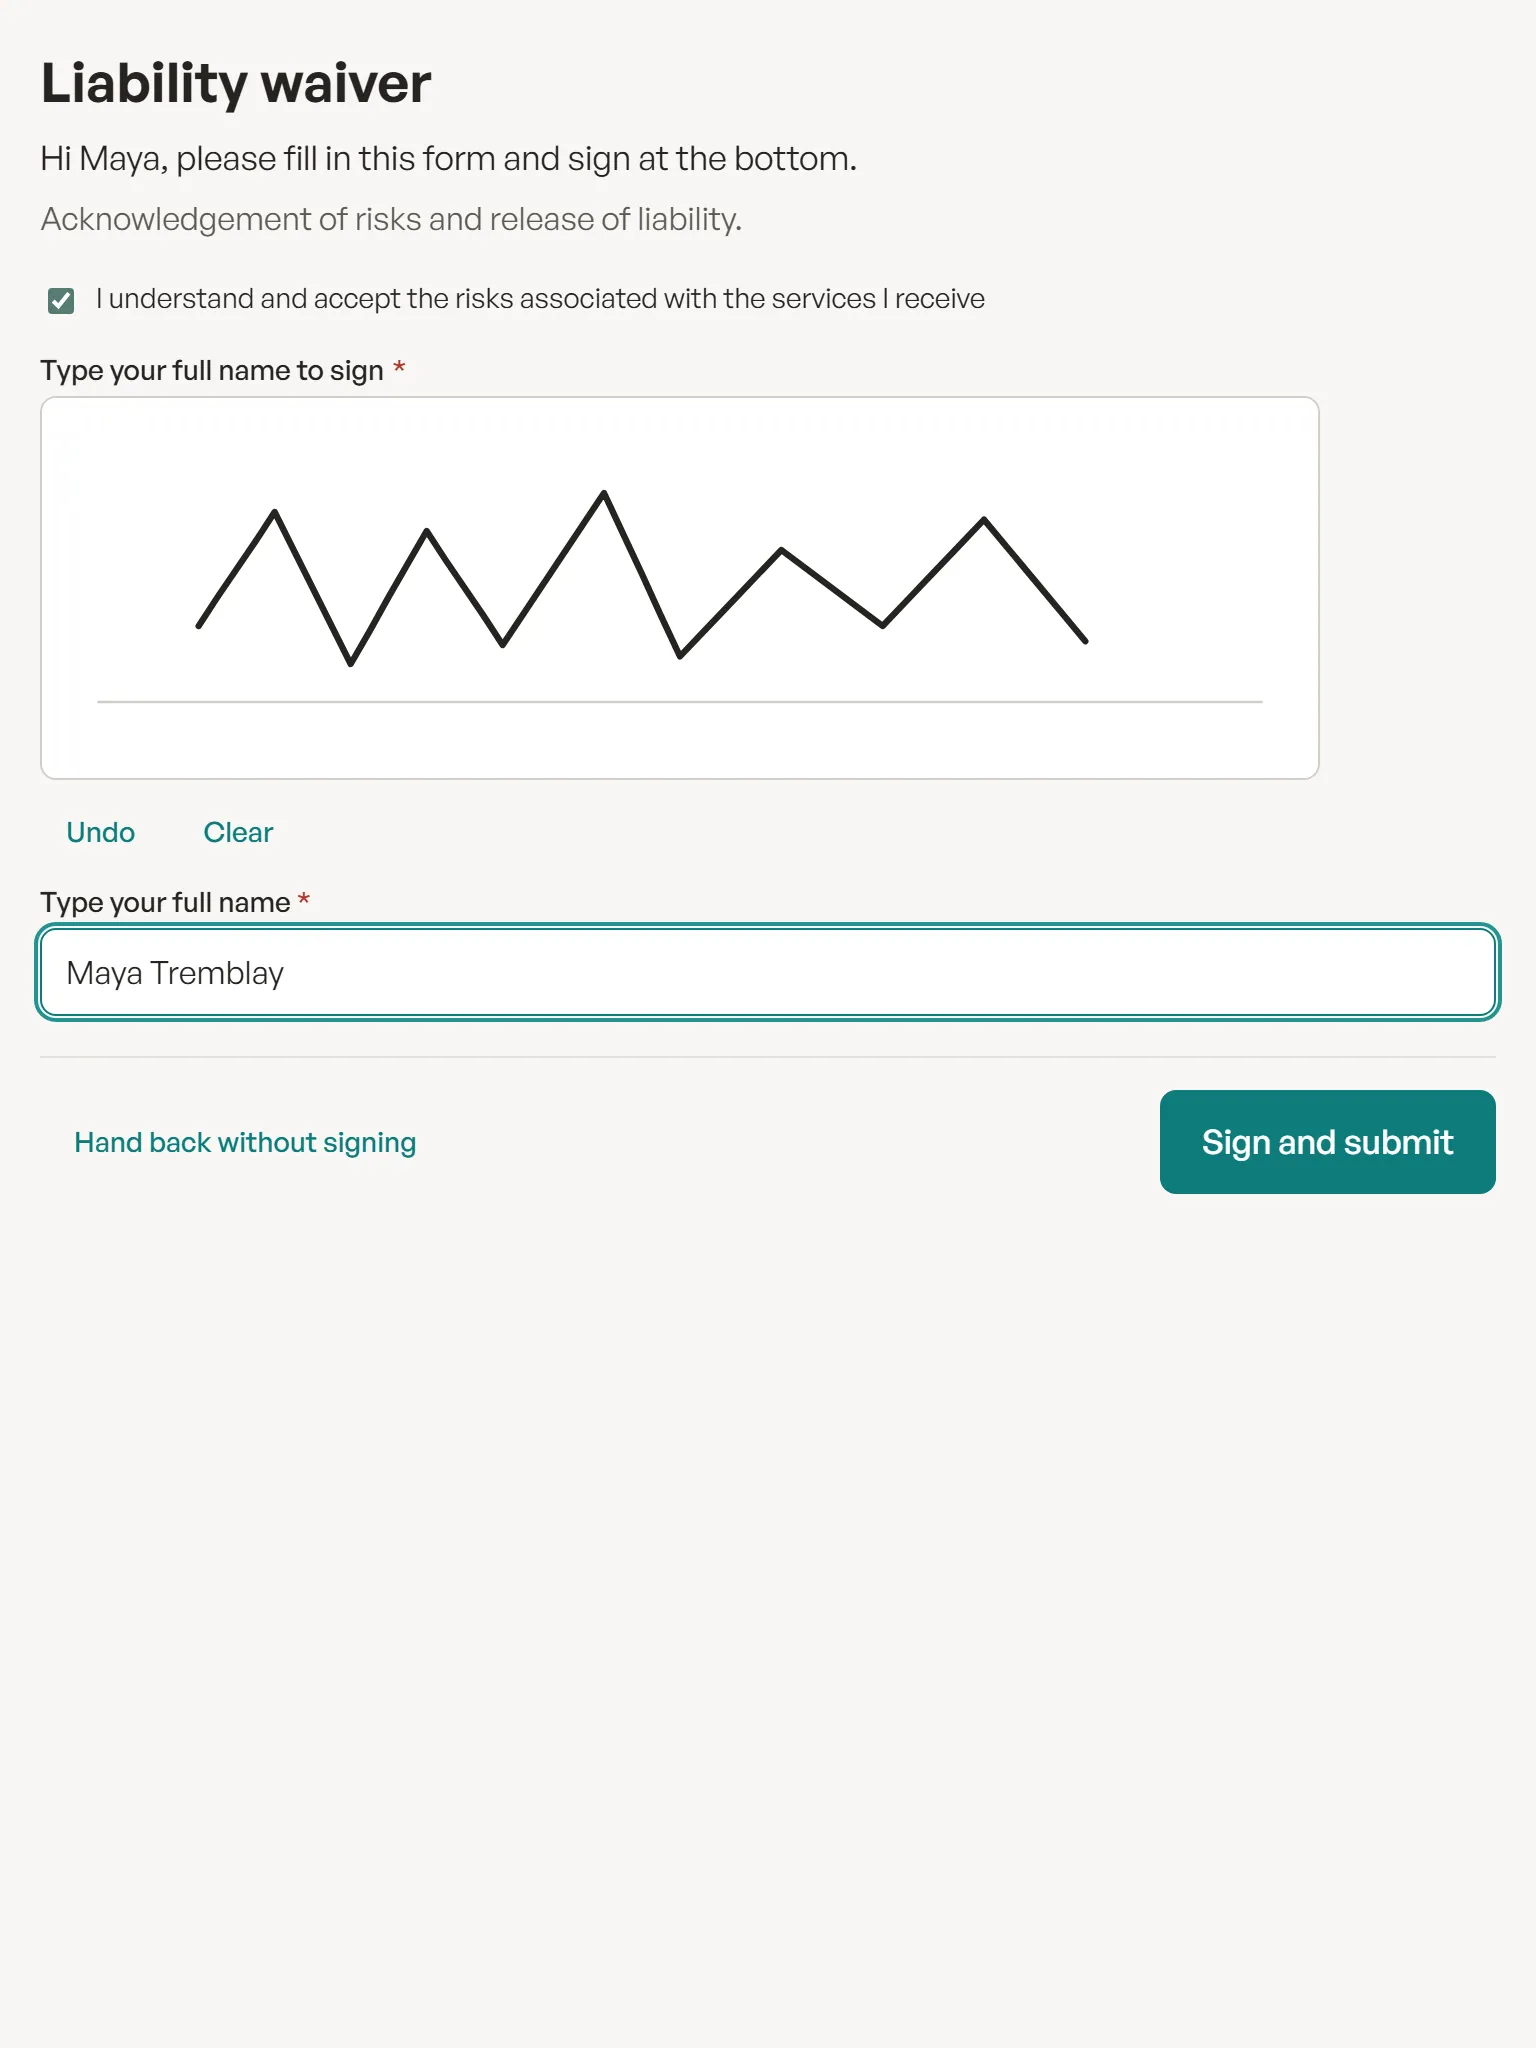
Fill on this device — the client sees only the form, signs with a finger or stylus, and hands the device back.
When a client is in front of you — at the desk, or before a service — they can fill in and sign a form on your tablet or phone:
- Open the client (Clients → the client) and go to the Forms & consents tab.
- Press Fill on this device, choose a published Form, optionally link it to one of their visits, and press Hand to … (the button names the client).
- Hand over the device. The client sees only the form — the rest of PeasyBooking is covered and can’t be reached — fills it in, signs in the box, types their full name, and presses Sign and submit.
- They see “Thank you … Your form is signed” and are asked to hand the device back. Press Done — hand back; the signed form is on their profile, marked In person and witnessed by you.
If the client changes their mind, Hand back without signing closes the form and nothing is saved. If the form was updated while they were filling it in, they’re asked to read it again before signing.
Sensitive intake forms
Available on: All plans
Templates can be badged as sensitive (a sensitivity or allergy questionnaire, or a service-history intake, for example) so those forms stand out in the list. Their answers are stored and exported like any other form. PeasyBooking isn’t built to keep health records — if a regulated health profession requires you to keep a record, keep it in the system built for that. Forms never change a client’s marketing or SMS consent — those are captured only in their dedicated flows.
For aesthetics businesses, the visit completion form also captures product, lot number and service area — operational traceability that shows on the visit workspace. Pair it with a follow-up interval and the checkout rebooking prompt books the review visit; the seeded photo consent form template completes the chain.
24. Reports & analytics
Available on: Essential+· basic dashboards on all plans
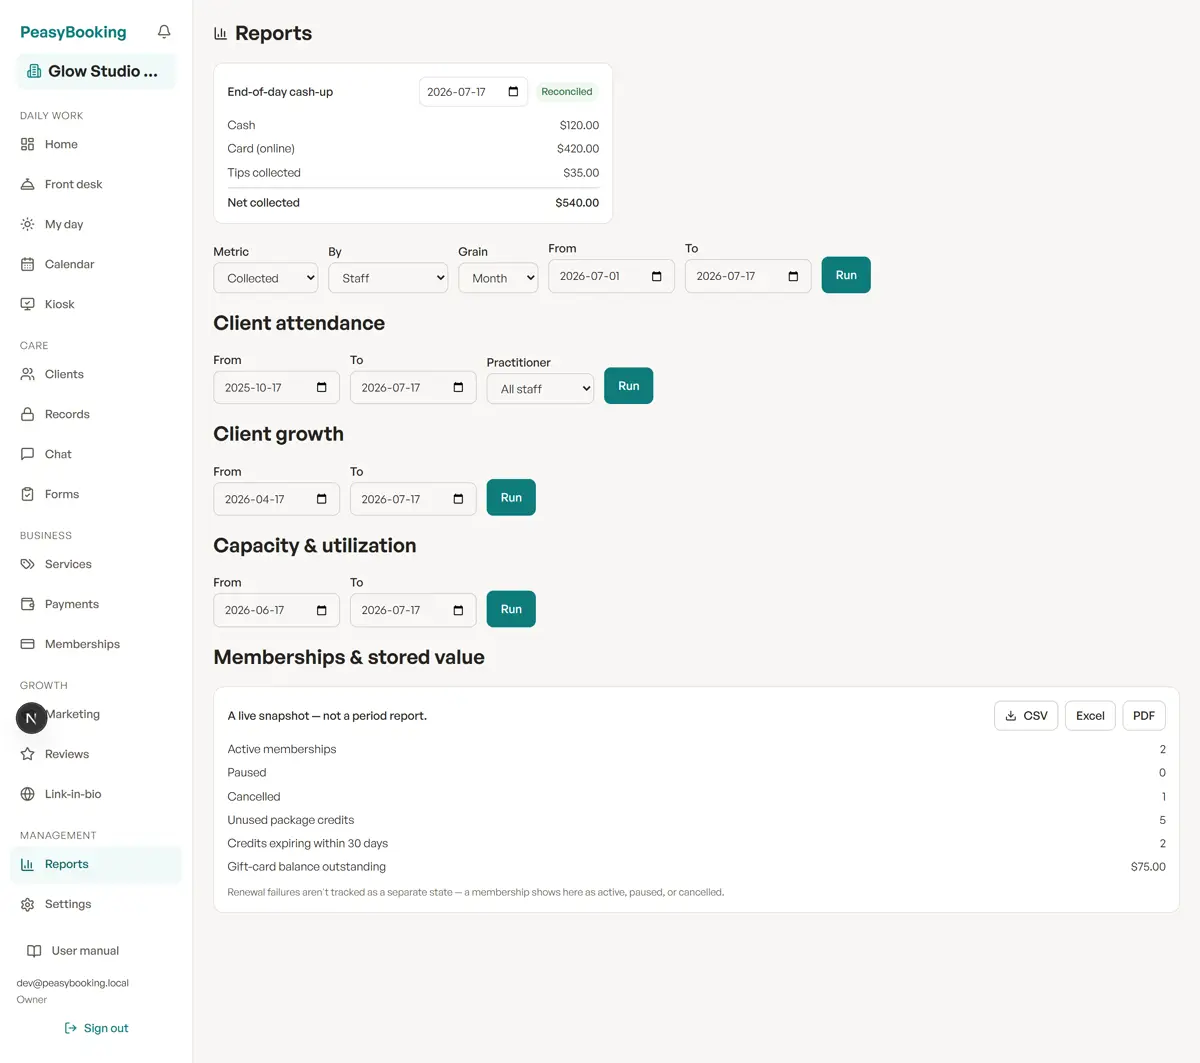
Reports — the cash-up, the report builder, and a card for each report, all starting on the same last-30-days window.
Every plan shows the day’s figures on Home. From Essential up, the Reports page unlocks the full suite — on lower plans you’ll see it as a blurred preview so you know what upgrading unlocks. Each report is its own card with From and To dates and a Run button, and every card starts on the same window — the last 30 days, today included — so the numbers line up from card to card. Most tables export to CSV, Excel, or PDF.
- End-of-day cash-up — for any day you pick: collected by payment method, tips, refunds and net collected, marked Reconciled or Discrepancy.
- Report builder — pick a Metric (collected, gross, net, refunds, or outstanding), break it down By staff, service, payment method, booking source, or client type, choose a Grain (day, week, month, quarter, year, or a single total), and compare against the prior period.
- Client attendance, Client growth, Capacity & utilization, Receivables aging, Tips, Staff pay, and Memberships & stored value — below.
Client attendance
Available on: Essential+
The Client attendance report shows, per customer, how often they showed up, no-showed, or cancelled over any date range — optionally filtered to one practitioner. Use it to spot repeat no-shows (e.g. “how many times has this client no-showed in the past nine months?”).
Client growth
Available on: Essential+
Client growth turns your visit history into retention numbers for any period: new clients, retention (what share of the period's visitors had been in before), rebooking (what share left with their next visit already on the books), clients gone inactive (no visit in 90 days), and lifetime value — the average collected per client, plus your top clients by lifetime revenue. Underneath, Nothing booked ahead lists the clients who visited in the period but have no next visit booked — the longest since their last visit first, each linked to their profile — so you know exactly who to invite back.
Capacity & utilization
Available on: Essential+
Capacity & utilization compares booked time against each team member's scheduled working hours (net of breaks and time off) for any period, shows booked time per room or equipment when resource scheduling is on, your busiest days and hours, and current waitlist demand by service — where unmet demand is queuing.
Receivables aging
Available on: Essential+· with payments
Open balances on visits, grouped by how long ago the visit was — Under 7 days, 7–29 days, 30–59 days, and 60+ days — with the number of visits and the amount owed in each. A link takes you to Payments › Outstanding to see and collect each one.
Tips
Available on: Essential+
Tips recorded in the period, per team member, with the total.
Staff pay
Available on: Essential+· owners, managers and accountants
A payroll guide per team member for the period: what was Collected for their visits, their Commission rate, the Commission, their Tips (passed on in full), and the resulting Payout, with a total. It’s a guide for your payroll, not a payment — PeasyBooking doesn’t pay anyone. One honest note: there isn’t a screen for setting commission rates yet, so unless a rate has been set up for your business, everyone shows 0% and the payout is simply their tips.
Memberships & stored value
Available on: Essential+
A live snapshot of recurring revenue and what you owe in services: memberships by status (active / paused / cancelled), unused package credits (and how many expire within 30 days), and outstanding gift-card balances. One honest note: renewal failures aren't tracked as their own state, so this report never claims a "failed renewals" number.
25. Custom email domain (branded sender)
Available on: ScaleAdd-on on lower paid plans· included on Scale
By default, client emails are sent from PeasyBooking’s shared, verified sending domain. With this feature, reminders and confirmations are sent from your own domain (for example hello@yoursalon.com) for fully branded email. It’s included on Scale and available as a $25/month add-on on the other paid plans — set it up under Settings → Billing & add-ons → Email branding.
To be clear: this is email only — it doesn’t create a website, and we don’t register or sell you a domain. You bring a domain you already own and add a few DNS records (an SPF entry plus DKIM keys we generate for you) to your existing DNS; we verify them before it goes live. You keep your nameservers and DNS host, and any existing email on the domain keeps working — we only add records, we don’t take over your zone.
26. Importing your data
Available on: All plans· owner or receptionist
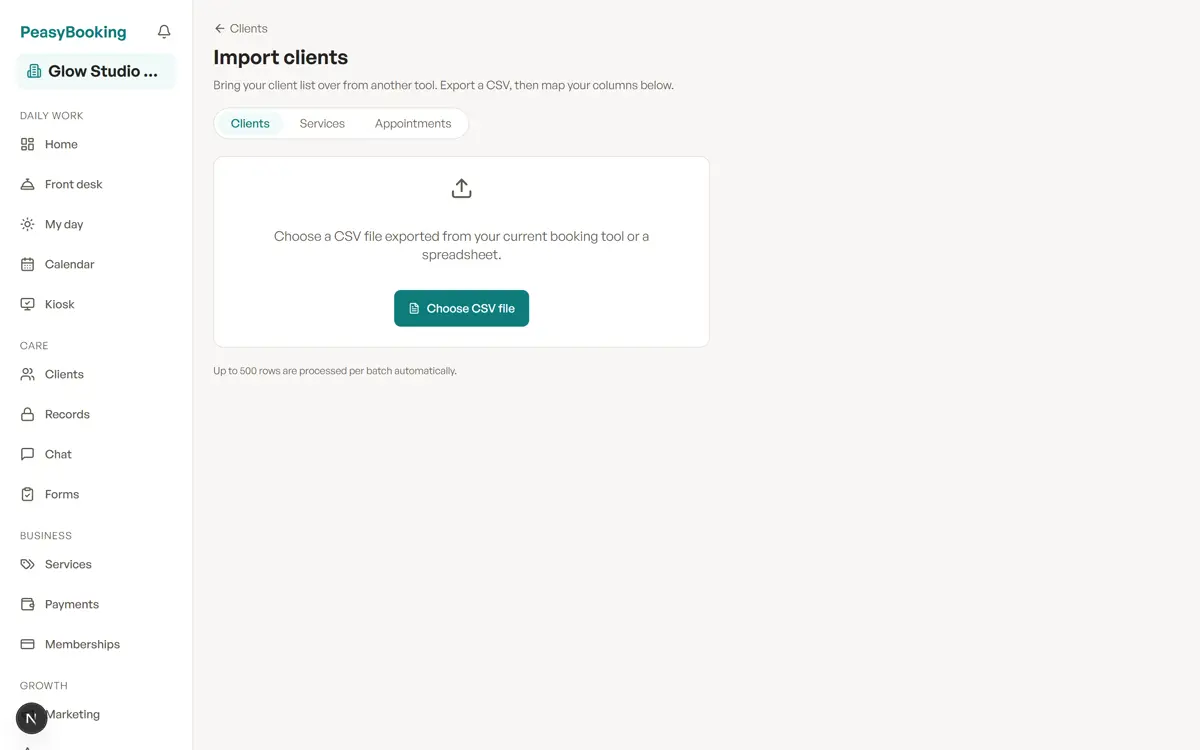
Import your clients, services and past appointments from a CSV — map your columns once, with a preview before anything is saved.
Moving from another tool? Use Import (on the Clients and Services pages, and on the last step of guided setup) to bring your data over from a CSV exported from your old system or a spreadsheet. Three object types are supported — everything else (memberships, packages, gift-card balances, stored cards, documents) you set up fresh in PeasyBooking:
- Clients — names, contact details, date of birth, tags, allergy notes.
- Services — name, duration, price, category.
- Appointments — matched to your clients, services, and staff.
The wizard walks you through four steps:
- Upload your CSV file.
- Map your columns to PeasyBooking fields (we auto-guess from headers), and tell us the file’s currency and date format.
- Preview — see how many rows are ready, duplicates, or have errors.
- Import — only the valid rows are added; duplicates and errors are skipped and listed.
Duplicate clients are detected by email, or by name and phone when there’s no email; services are matched by name. If appointment rows name practitioners who aren’t on your team yet, the preview offers to add them to your team and preview again (they’re added as staff without a login, so you can invite them later). Rows that still can’t be matched, or that conflict with an existing booking, are reported so you can fix and re-import.
27. Settings
Available on: All plans· some settings are owner-only
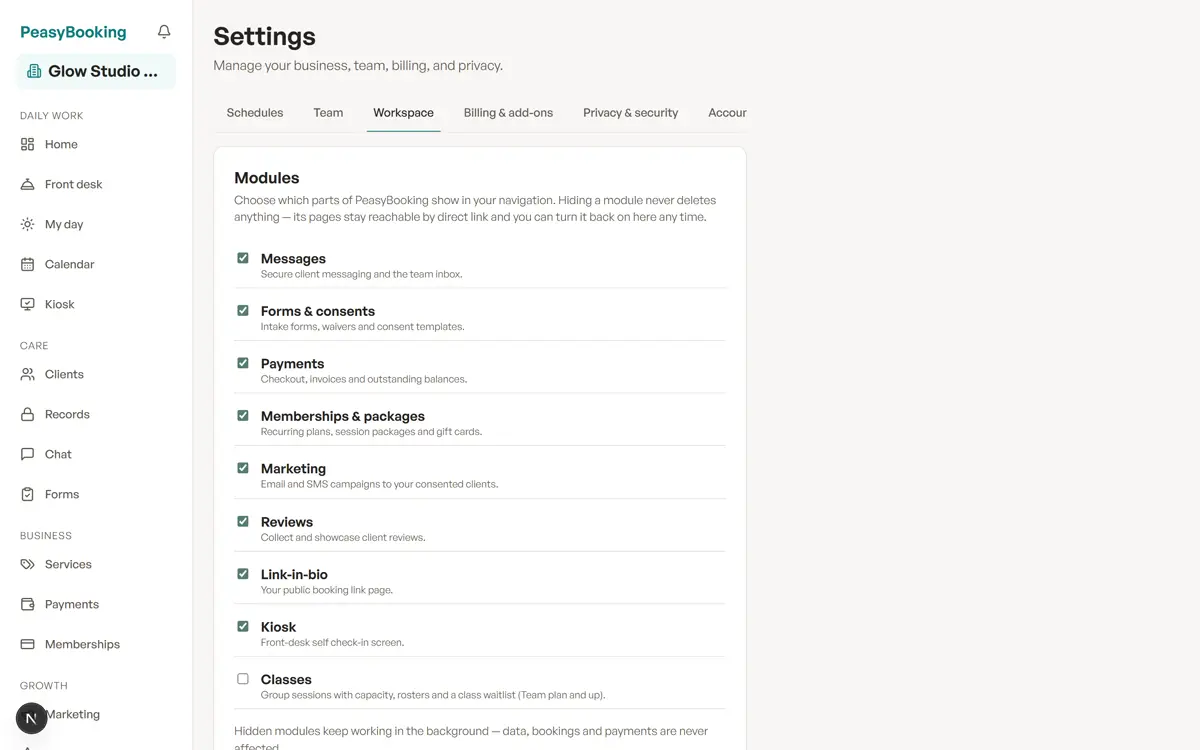
Settings — pick a section on the left. Here, Workspace: turn navigation modules on or off and match your field's vocabulary.
Settings is the control room for your account. Its sections are listed down the left (on a phone they wrap into a row above the content), and what you see depends on your role — receptionists and staff see only Account:
- Schedules — each team member’s bookable hours (a member with no hours can’t take bookings), plus the Booking rules and Resources cards.
- Team — invite, assign roles, and remove teammates (see Your account, team & roles).
- Locations (owner only) — Your locations: each location’s address and how much of it clients see, how many locations your plan includes, and Add location. A new location gets working hours straight away (the confirmation says which) — adjust them under Schedules.
- Money — money permissions: delegate money actions per team member, with optional per-transaction and daily limits (owner only).
- Workspace — modules, business category, terminology (below), and the Kiosk PIN on plans with the kiosk.
- Billing & add-ons (owner only) — your plan (monthly/annual switcher, Manage billing & payment method, invoice history), the Marketplace card, the SMS add-on and appointment-reminder schedule, online payments, the booking-widget snippet, search visibility (your booking and links pages are listed in search engines by default — hide them here any time; anyone with the link can still book), and the custom email domain.
- Privacy & security — the Access log (below).
- Account — the owner-only Business name card to rename the business (renaming changes only the displayed name — your booking link stays the same, so shared links and any embedded widget keep working), the language of your emails, signing out, Transfer ownership, and account closure.
Access log — who looked at what
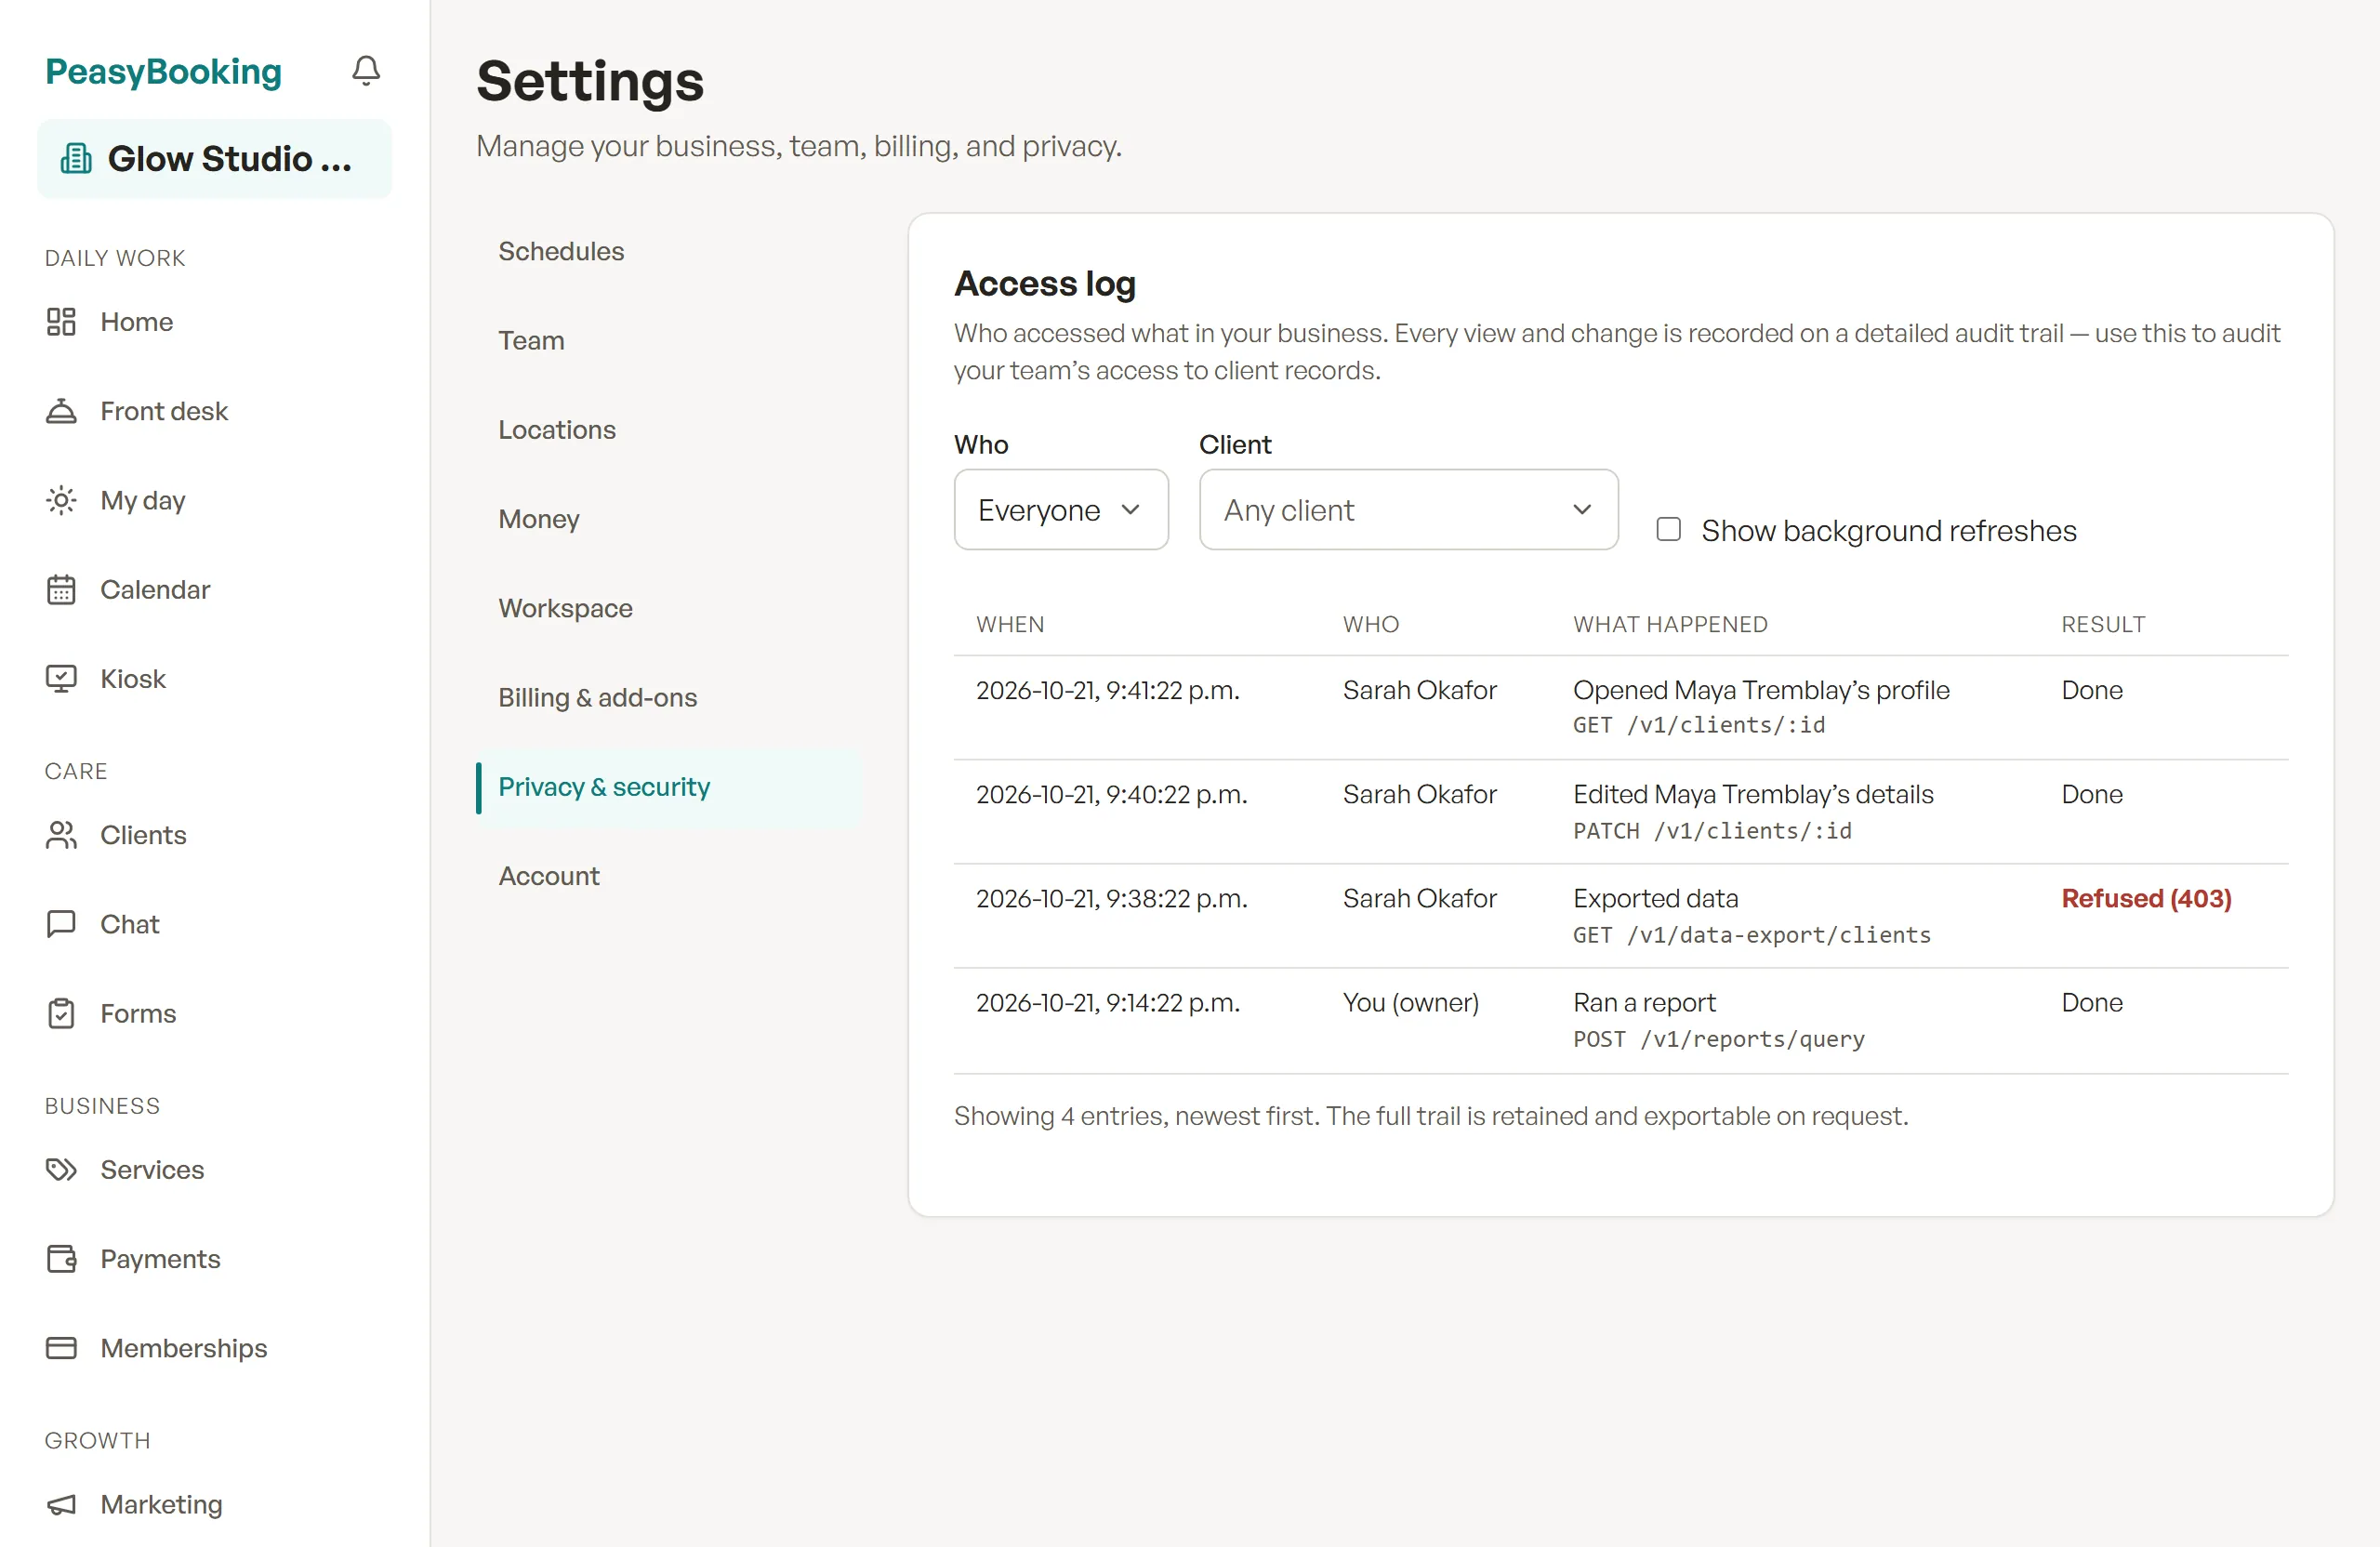
The access log — each entry is a plain sentence, filterable by person and by client.
Settings → Privacy & security → Access log (owners and managers) is the audit trail of who accessed what in your business — use it to check your team’s access to client records. Every view and change is recorded, and each entry reads as a sentence — for example “Opened Jane Doe’s profile”, “Read Jane Doe’s service notes”, or “Refunded a payment for Jane Doe” — with when, who, and whether it was Done or Refused.
- Who narrows it to one teammate; Client narrows it to one client (entries are matched to a client from this update on — older entries can’t be).
- The app’s own routine background refreshes are hidden unless you tick Show background refreshes; refused requests always show.
- The newest 100 entries show first; Show older loads more. The full trail is retained and exportable on request.
Modules — show only what you use
Settings → Workspace → Modules (owner/manager) chooses which optional areas appear in your navigation: Messages, Forms & consents, Payments, Memberships & packages, Marketing, Reviews, Link-in-bio, Kiosk, Classes (Team plan and up), and Service notes (Starter plan and up; off unless you turn it on, except for aesthetics businesses). New signups start with the set recommended for their business category — the same tab shows your Business category with a Use recommended button that re-applies the defaults without touching anything you’ve already set. Hiding a module never deletes anything — its pages stay reachable by direct link, bookings and payments keep processing, and you can turn it back on any time. Your plan still decides what's included: a module toggle never unlocks a feature your plan doesn't have.
Terminology — your vocabulary
The same screen sets how your dashboard refers to the people you serve, with these vocabulary packs: Standard — clients & appointments, Salon — clients & stylists, Aesthetics — clients & aestheticians, Spa — guests & sessions, Fitness — members & trainers, Barbershop — clients & barbers, Nail studio — clients & nail techs, Lashes & brows — clients & artists, Tattoo — clients & artists, Pet grooming — pet parents & groomers, and Massage — clients & appointments. Picking a specialty in guided setup chooses its pack for you. It changes labels inside your dashboard only — your public booking page wording stays the same.
More than one business
One login can run several businesses. Once you have more than one, the business name at the top of the sidebar becomes a business switcher that flips between them. New business — in that switcher, or in the account menu in the sidebar’s footer — starts a fresh guided setup. Each business is fully separate — its own plan, clients, staff, booking page, and data.
28. Closing your account & your data
Available on: All plans· owner-only
You own your data, and you can close your account at any time — no phone call, no retention flow:
- Go to Settings → Account and find the Close account card.
- Click Close account & delete data…, type your business name to confirm, and click Schedule deletion.
- A 30-day grace period begins, with a banner in your dashboard. Change your mind any time in those 30 days and undo it from the banner — everything comes back exactly as it was.
After 30 days, access ends and your business’s data — bookings, clients, staff, and settings — is deleted from our live systems, subject to any legal hold and the limited records our Data Retention Schedule lists (for example tax, billing, and security records). Encrypted backup copies age out over roughly the following 30 days, and we don’t restore individual records from backups. Payment records processed through Stripe remain with Stripe under its own retention policies. If you need a copy of your data first, export what you need (report tables export to CSV/Excel/PDF, and form submissions download from client profiles) or ask support before closing. See our Privacy Policy for how we handle personal information and Terms of Service for the full terms.
29. Help & support
Available on: All plans
Need a hand? Email support@peasybooking.com and a real person answers — we don’t promise a turnaround, we just get to it. You can re-open this manual any time from the link in your dashboard.